Publish Approvals are workflows that can be set up to require users with publish permission or higher to go through an approval process before uploading, editing, or adding new versions of assets to your Asset Library.
Table of Contents
What Are Publish Approvals for Assets?
A Publish Approval on assets ensures that any asset being uploaded to a folder, edited, or submitted as a new version goes through a review and sign-off process before it is made available to end users. This is set up by Main Admins in the Admin > Workflows area.
Common reasons to use a Publish Approval on assets include:
- Quality and compliance control - ensure assets published to folders are brand-approved, marketing-compliant, and are high-quality before end users can access them.
- Consistent metadata tagging - have a reviewer check that the correct keywords, filters, and metadata have been applied before an asset is available in the platform.
- Proofing and content creation workflows - upload a draft asset, use the Proofing/Markup tool to annotate and comment, add revisions as needed, and only publish the final approved version to the folder. This brings your proofing and collaboration process directly into your platform.
Applying a Publish Approval to a Folder
Once a Publish Approval has been created by a Main Admin in the Admin > Workflows area (see this article for more details on how to set one up), it can be applied in one of two ways:
- Global approval - if the approval has been created as a global process, it will automatically apply across all folders in your asset library with no additional configuration needed.
- Folder-specific approval - if the approval is not global, it must be manually applied to each individual folder where it is needed. Follow the steps below.
How to Apply a Workflow to a Folder
| 1Navigate to the Folder | Go to your Asset Library and locate the folder you want to apply the approval to. |
| 2Open Folder Settings | Select the three vertical dots on the folder and choose Folder Settings. |
| 3Go to Advanced Options | Select the Advanced Options tab within Folder Settings.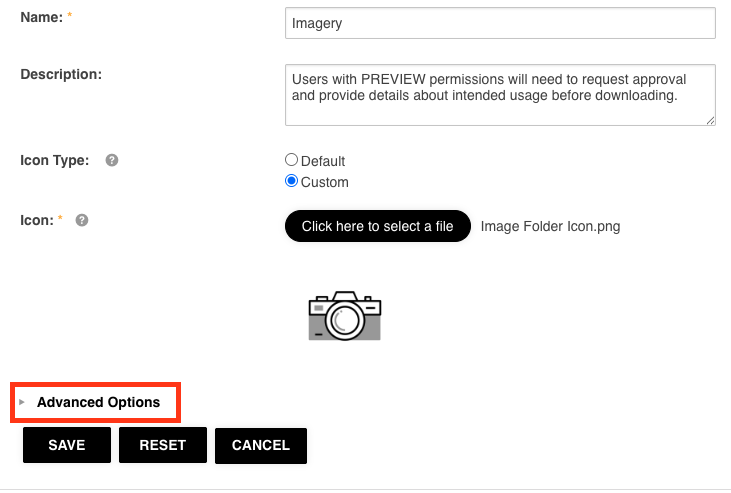 |
| 4Add the Workflow | In the Workflow setting, select Add Workflow and choose the relevant approval workflow from the list. |
| 5Adjust Local Settings (Optional) | If local customization has been enabled, you can adjust folder-level workflow settings here - for example, whether the Required By field is shown or which reviewers are assigned. |
| 6Save | Select Save on the workflow, then Save on the Folder Settings. The publish approval is now active on this folder. |
Requesting Approval
Once a Publish Approval is enabled on a folder, it will trigger whenever a user with the appropriate permission level attempts to upload a new asset, edit an existing asset, or add a new version of an asset within that folder.
Completing the Approval Request Form
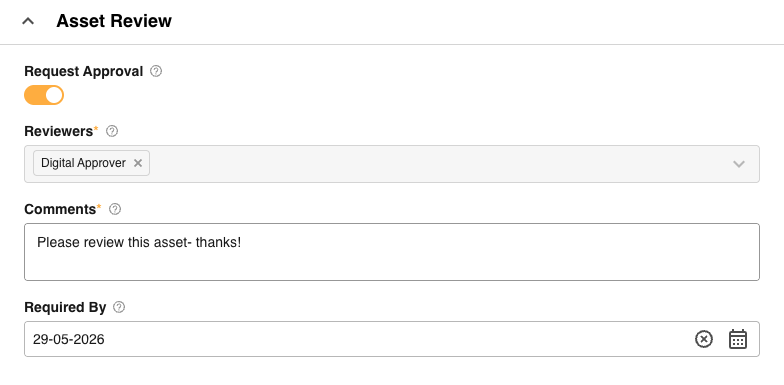
When uploading or editing, the requester can fill in any relevant metadata against the asset. Scrolling to the bottom of the edit/upload panel will reveal the approval request form, which contains the following fields:
| Field | Details |
|---|---|
| Request Approval toggle | Depending on workflow settings, requesters may be able to toggle the approval on or off. Main Admins and Approval Admins can always toggle this off, even if the approval is set to mandatory. Users with publish or folder admin permission cannot override a mandatory approval. |
| Reviewers | If reviewers are fixed in the workflow settings, the assigned reviewers will be pre-selected and cannot be changed. If Requester's Choice is enabled, the requester can select which users they want to review the asset. |
| Comment | A comment field for the requester to provide context to the reviewers about why approval is being requested. |
| Required By | If the Required By date field has been enabled in the workflow settings, the requester can select the date by which they need the approval completed. |
Once the form is complete, select Save/Submit Changes to send the request. Reviewers and/or the requester may receive an email notification depending on the email notification settings configured in the approval workflow.
Reviewing an Approval
Reviewers and requesters can access pending approval requests via the Approvals List in the platform navigation, or through a direct link in their email notification (if email notifications have been enabled for this workflow). The approvals list shows key information about each request, including the file name, status, who the approval is waiting on, required by date, the date/time the request was submitted, and the destination folder.

How to Review and Respond
| 1Open the Request | In the Approvals list, go to the Actions column and select Review Request. This opens the approval response page. |
| 2Review the Asset and Details | The response page shows: the asset itself, item details (metadata applied), request details (requester, comments, required by date), and request status (who it is waiting on, how many approvals are still required). For more details on these sections, please refer to the article here. |
| 3Markup / Proofing (Optional) | If using Publish Approvals as part of a proofing workflow, navigate to the Markup tab to annotate the asset and leave comments. Refer to the Markup and Proofing section for full details on this functionality.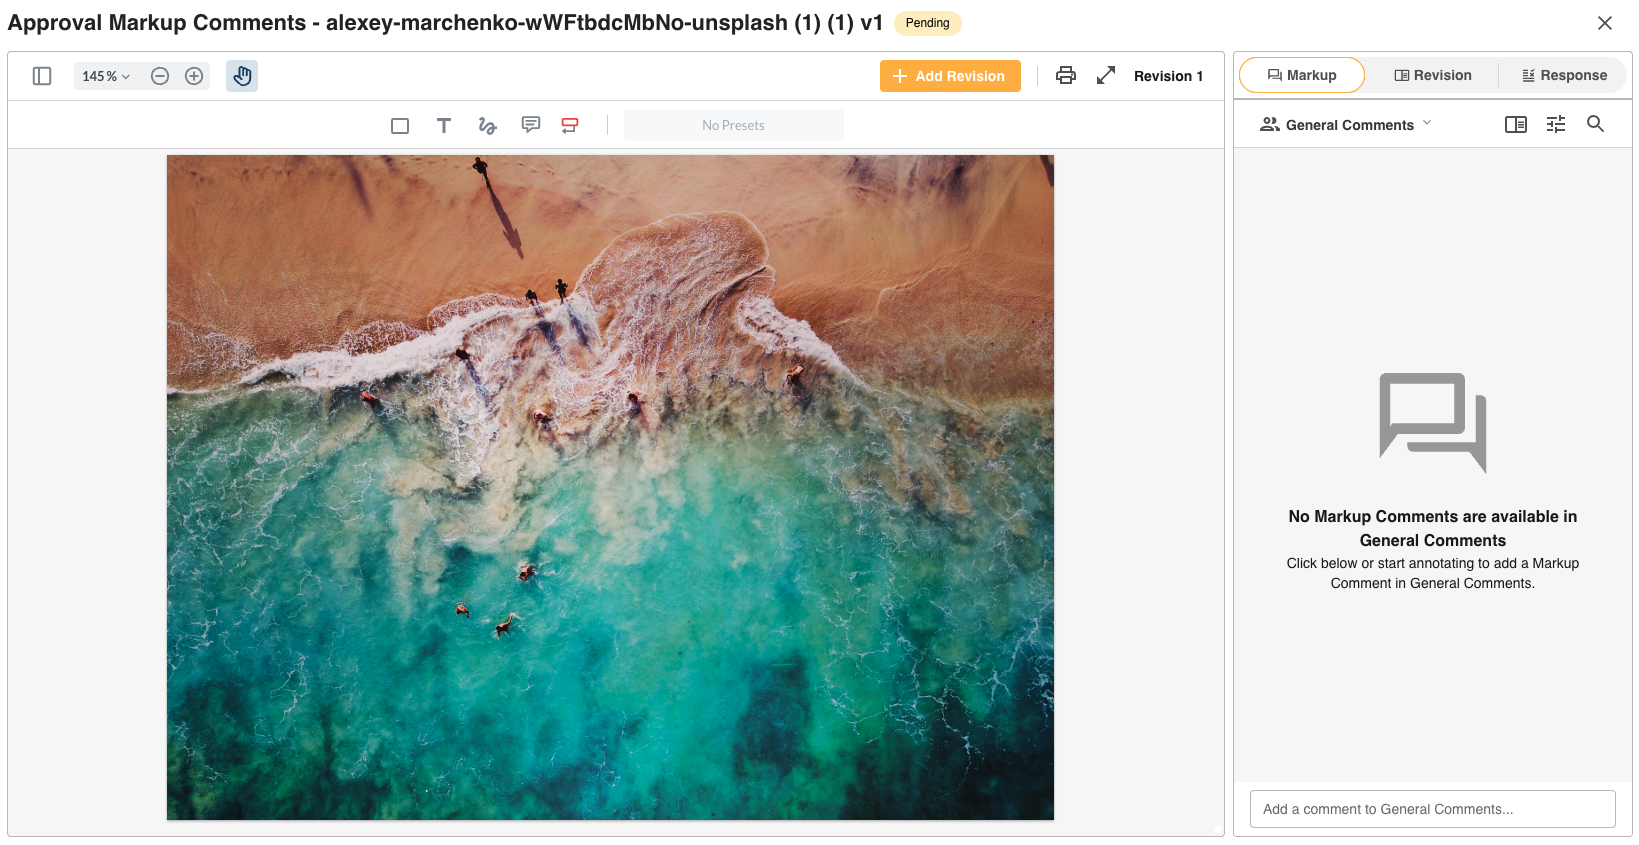 |
| 4Submit Your Response | Go to the My Response section. Enter a response comment (this may be mandatory depending on workflow settings), then select Approve or Decline. Note that the Decline option may not be available depending on your workflow configuration (usually if your organisation is using Proofing/Markups) . Select Submit Response when done.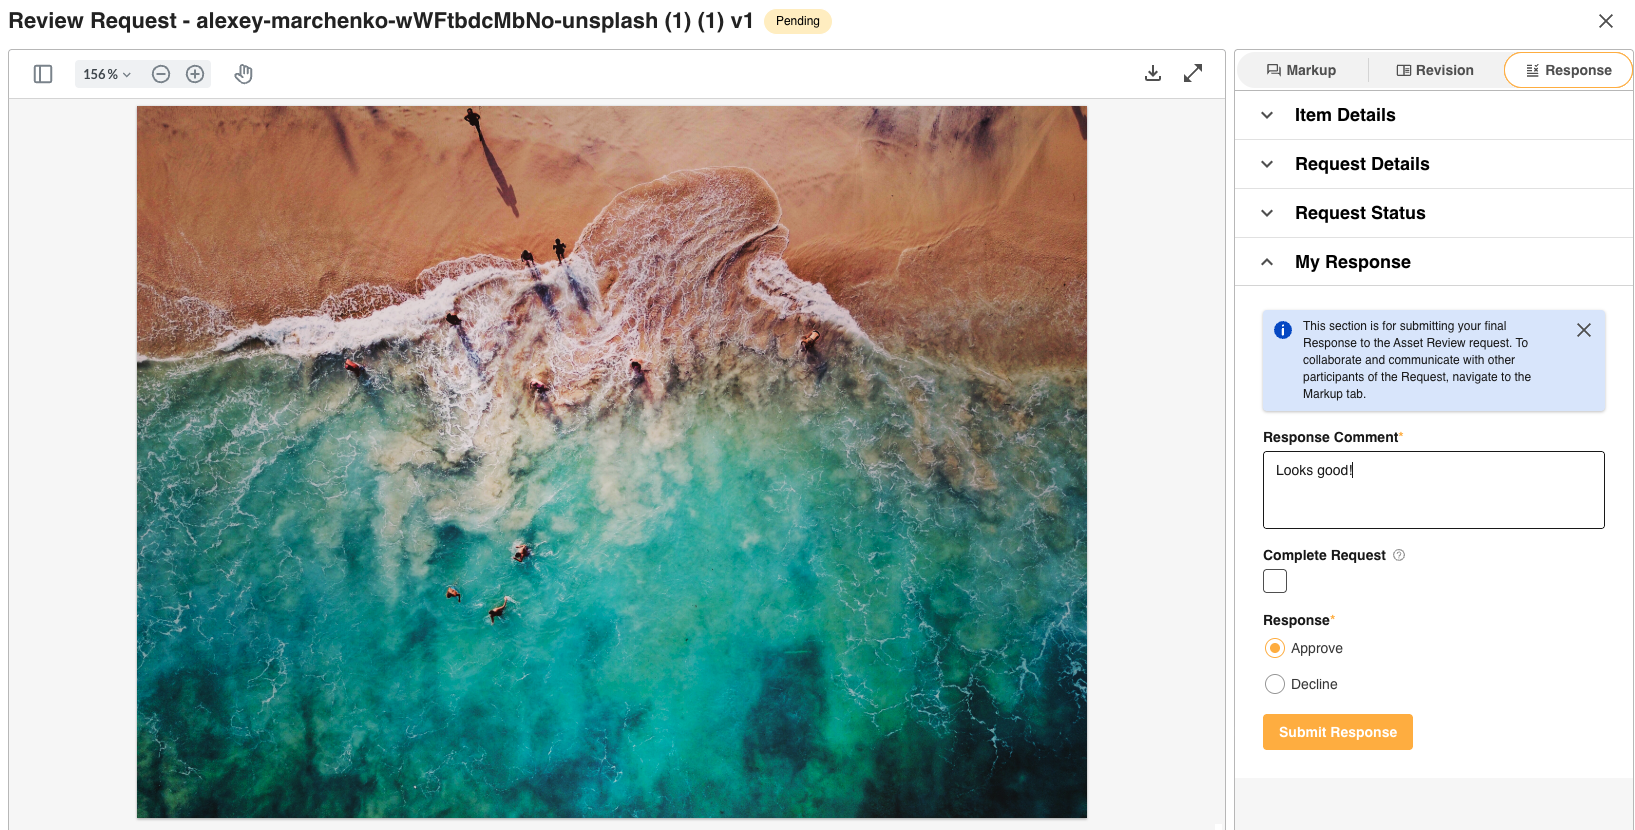 |
Complete Stage (Main Admins and Approval Admins Only)
Main Admins and Approval Admins will also see a Complete Stage option when submitting a response. Selecting this completes the approval request (on its current stage) immediately, regardless of whether other reviewers have responded. This is useful in situations where reviewers are unavailable - for example, if a reviewer has left the organisation and pending requests would otherwise be delayed indefinitely.
What Happens After Approval
If the workflow has multiple stages, the request is routed to the next stage of reviewers after each response. Once all required approvals have been provided and the asset is approved, the overall request is marked as "Approved" in the Approvals List, the requester is notified, and the file is published to the folder. New uploads will become visible in the folder, and edited assets will repopulate with the approved changes applied.
Limitations
There are a few important constraints to keep in mind when working with Publish Approvals on assets.
One Publish Approval Per Folder
Only one Publish Approval can be applied to a single folder at a time. Conditional approval logic - for example, routing to different reviewers based on asset metadata or who uploaded the file - is not currently supported for asset Publish Approvals.
Declined Requests Cannot Be Reopened
Declined Edits Remove the Asset from the Folder
Decline Response on Staged Approvals
Was this article helpful?
That’s Great!
Thank you for your feedback
Sorry! We couldn't be helpful
Thank you for your feedback
Feedback sent
We appreciate your effort and will try to fix the article