Attestation is a new capability for IntelligenceBank approval workflows. This article covers what it is, why it matters, how to set it up, how it works day to day, how to make changes, how to report on it, and answers to common questions.
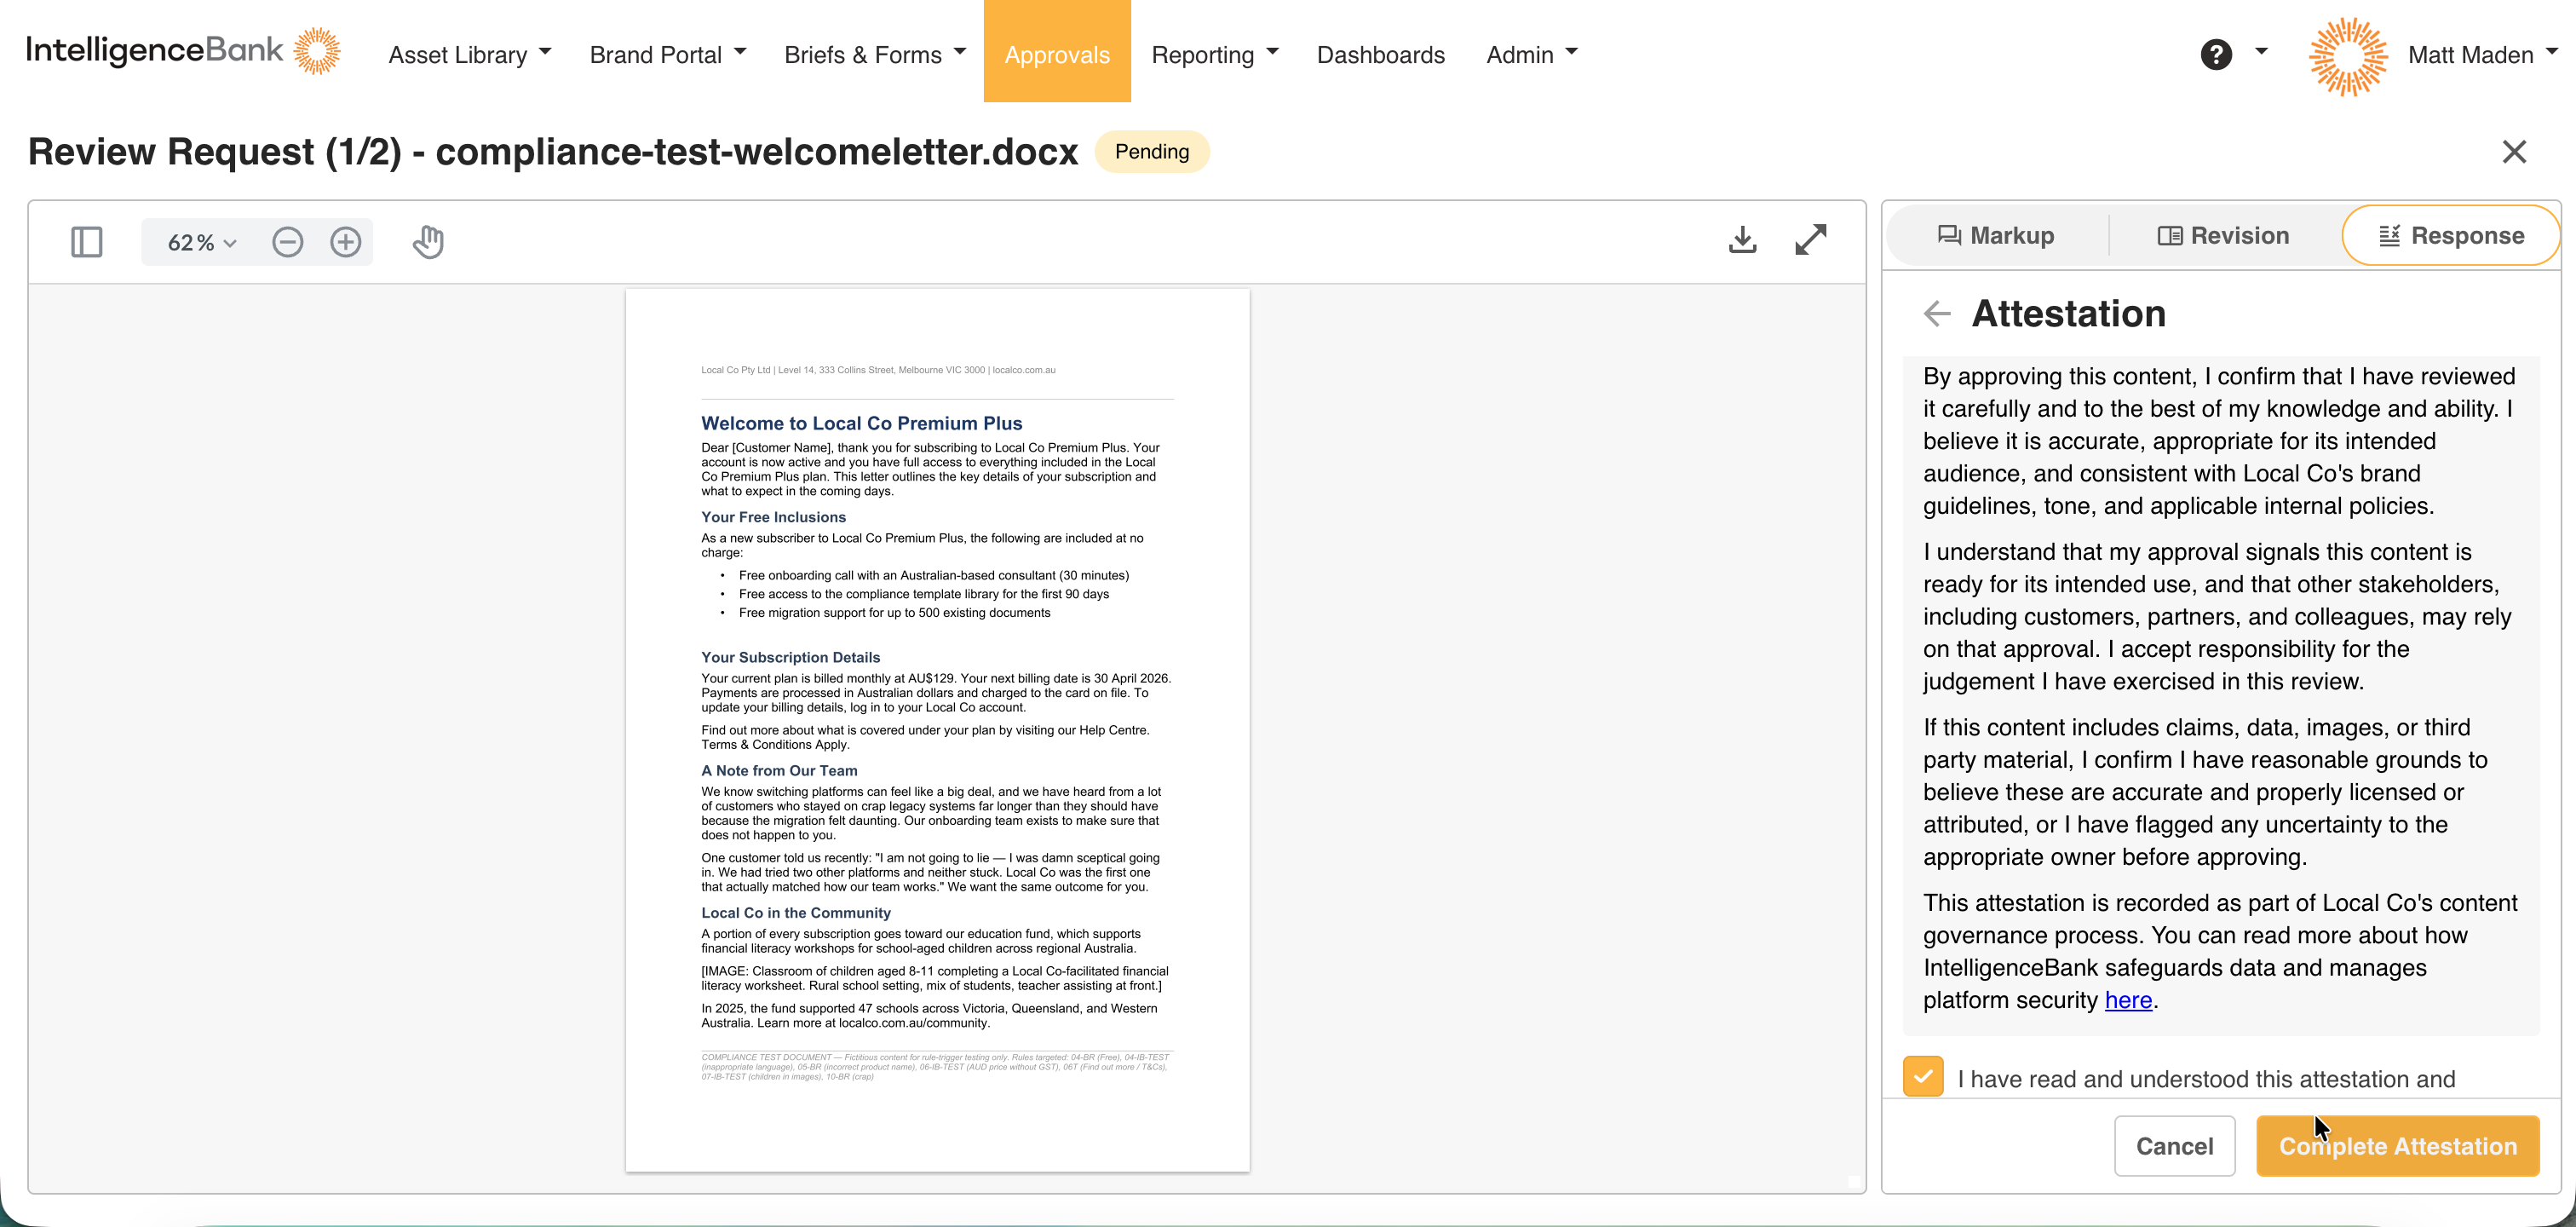
TABLE OF CONTENTS
What Is Attestation?
Attestation is a new capability now available within your approval workflows. It adds a required confirmation step to the approval process: before a reviewer can approve, decline, or approve with comments, they must read and tick a written statement acknowledging what they're confirming.
An approval on its own records who acted and when, but not what that person actually checked before acting. Attestation closes that gap. You write the statement once, decide which workflows, stages, groups, or reviewers it applies to, and from that point on, every relevant approval carries a written confirmation alongside it.
Why it matters: if your organization needs to demonstrate what was reviewed before content, records, or files were approved, attestation turns a single click into a documented, accountable decision. Every confirmation is stored permanently. It can't be edited or deleted, even if the statement's wording changes later, so you always have a reliable record of exactly what was confirmed, by whom, and when.
Getting Started
Confirm two things before you configure anything:
| Requirement | Details |
|---|---|
| Attestation is switched on for your account | Attestation needs to be enabled for your account before any of the screens described in this article appear. If you believe attestation should be part of your package and you don't see it, contact IntelligenceBank Support or your Customer Success Manager, they can confirm what's included and get it turned on for you. |
| You have the right permission | The Admin Attestation permission lets you create, edit, archive, and reactivate statements and Attestations. View permission lets you see existing statements and confirmed history, without editing controls. Your IntelligenceBank admin can confirm or update your permission level. |
Setting Up Attestation
Setting up attestation is three steps: write the statement, decide where it applies, then link it to a workflow. Each step lives in its own place, so you can update the wording or the targeting later without touching the others.
1. Write the statement
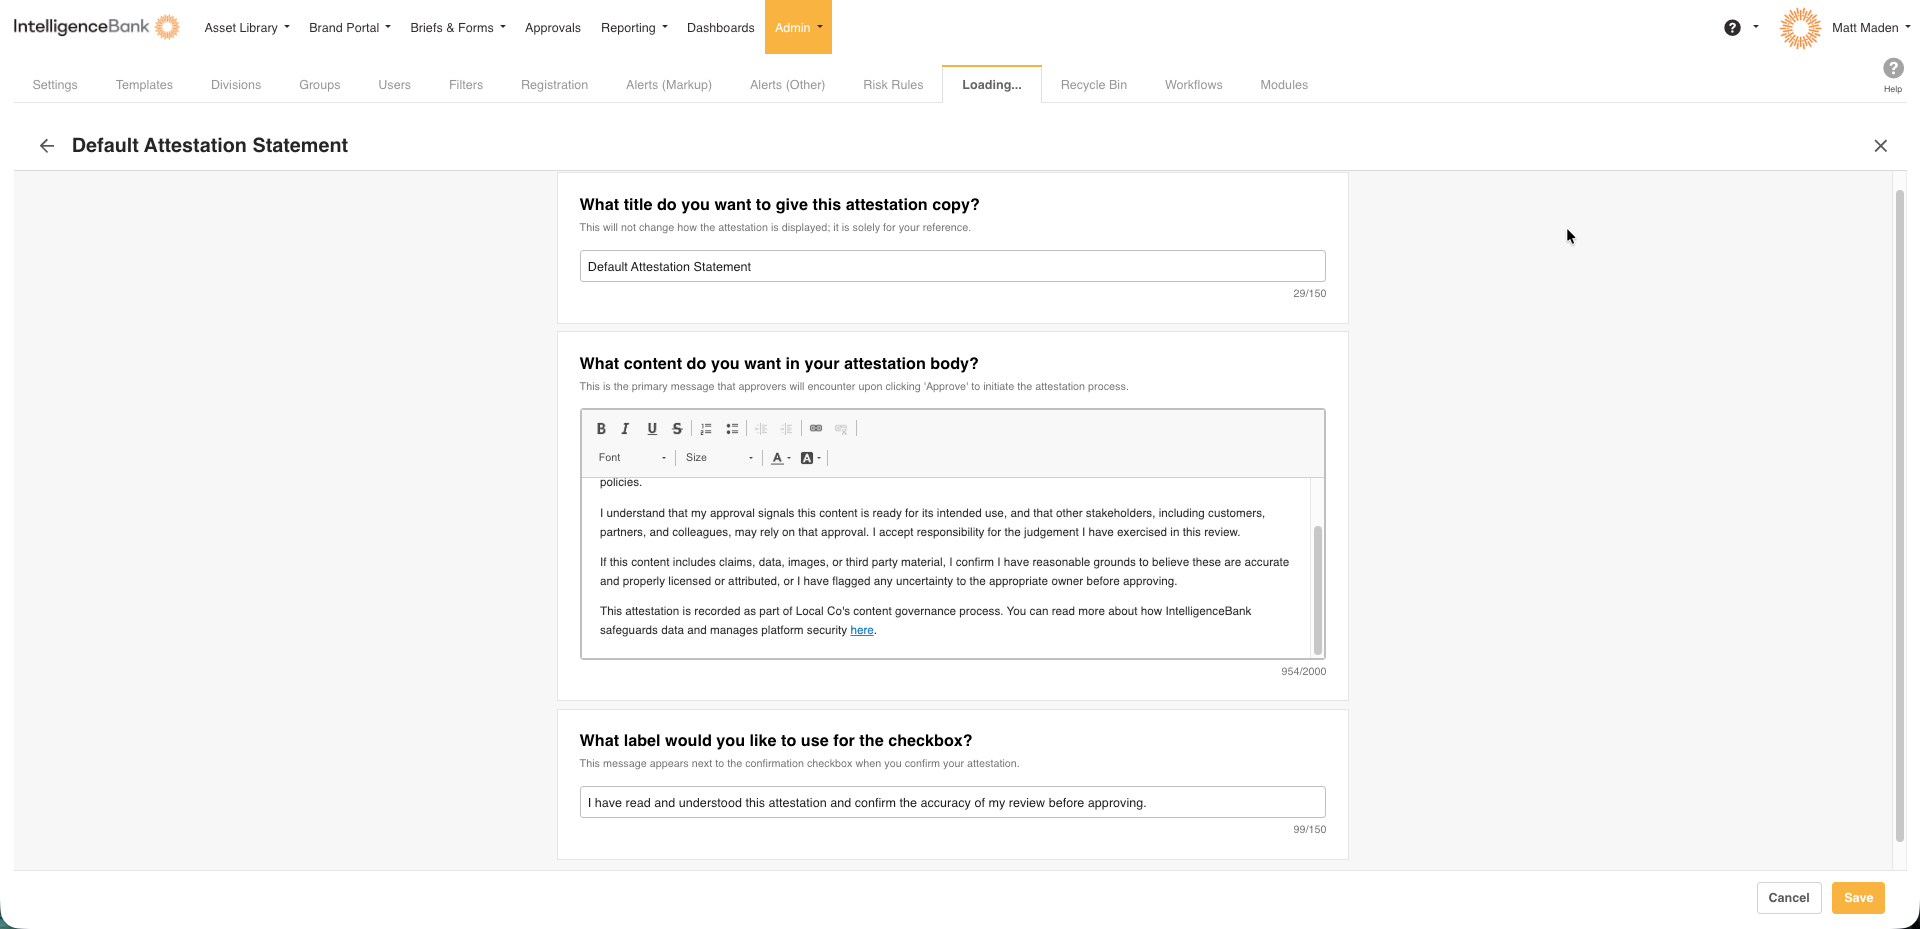
Statement wording lives in a central library. Write it once here so it can be reused across as many Attestations as needed.
| 1Open the statement library | From your site home, go to Admin, click the Attestation tab, then click Attestation Copy. Click Add New Copy. |
| 2Give it a title | Enter a Title (150 characters max). Reviewers never see this, it's for your own reference. |
| 3Write the statement body | Enter the wording in the Attestation Body field (2,000 plain-text characters max, formatting doesn't count toward the limit). Keep it broad enough to apply to everyone who needs it, if a specific role needs more detail, add a link in the statement to a policy or procedure document rather than writing a separate statement for that role. |
| 4Set the button text (optional) | The Attestation Button Text field (150 characters max) sets custom wording for the checkbox. Leave it blank and reviewers see the default: "I confirm I have read and agree to the above statement." |
| 5Save | Click Create. The statement is now in your library, ready to use. |
2. Decide where it applies
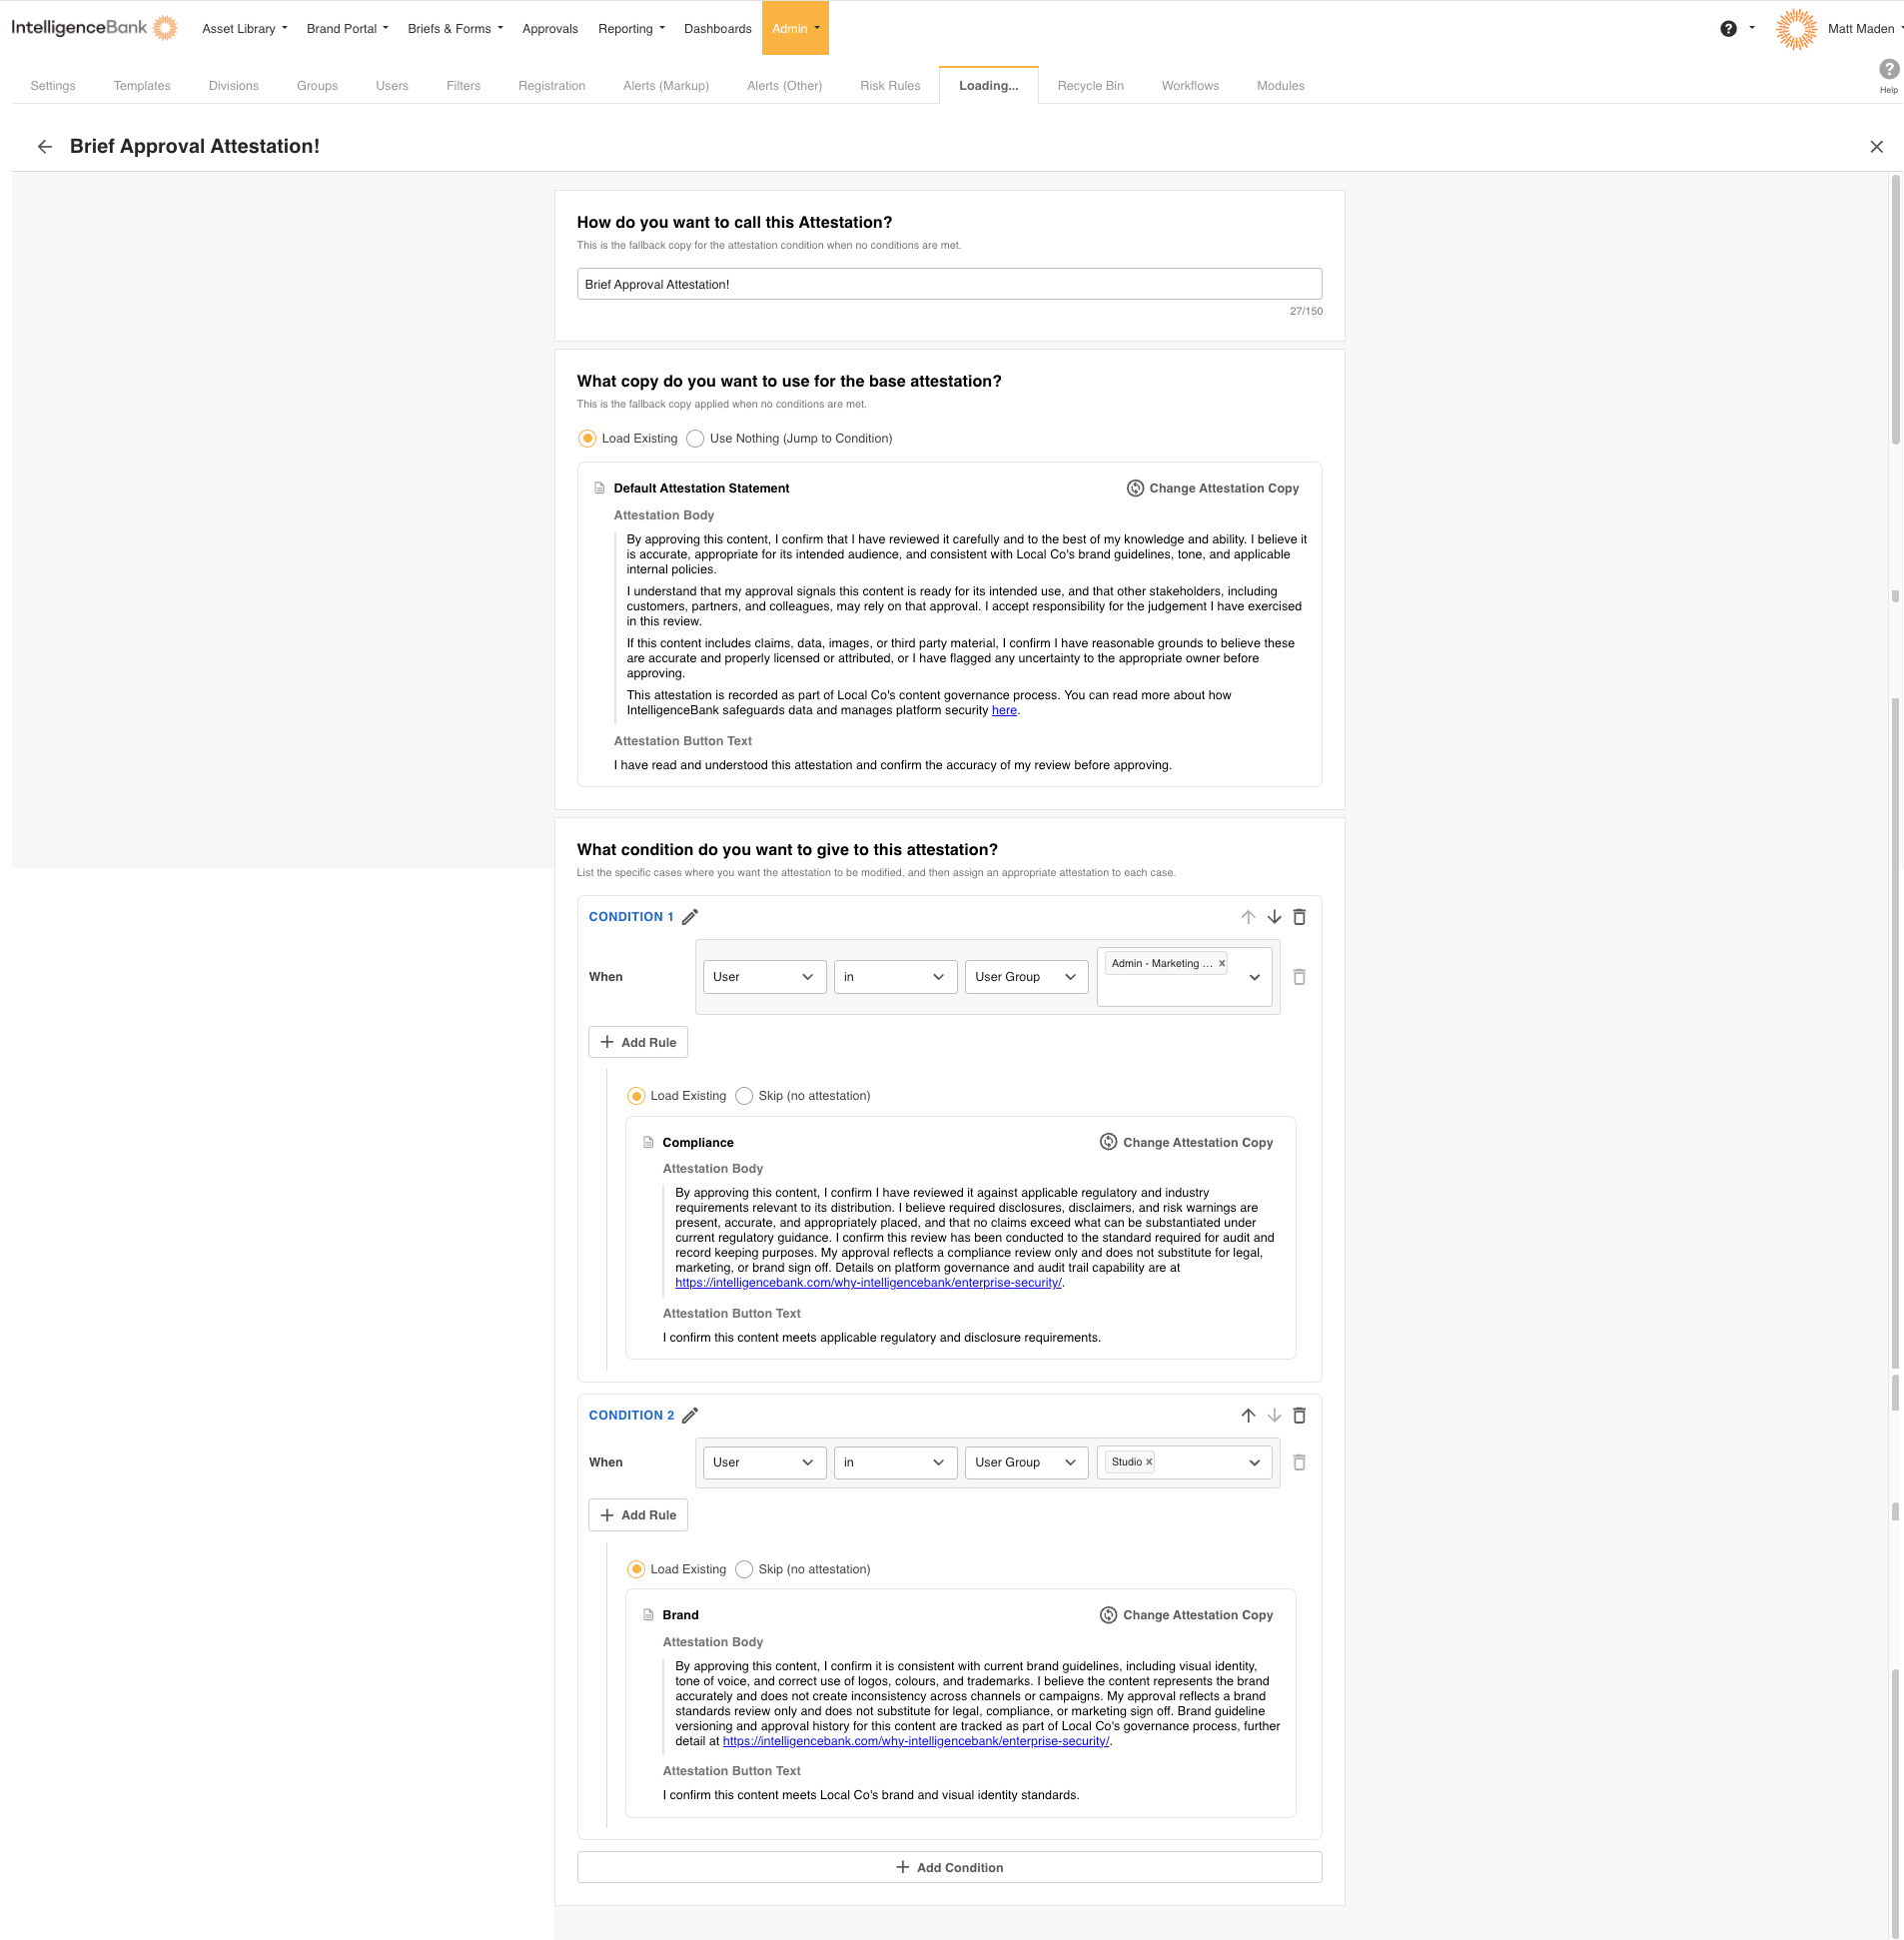
From your site home, go to Admin and click the Attestation tab, this opens straight to the Attestation library. Click Add New. This is where you choose a base statement and, if needed, set up different wording for specific stages, groups, or reviewers.
| 1Choose a base statement | Pick Load Existing and search for the statement you wrote, or pick Use Nothing (Jump to Condition) if you only want specific stages, groups, or reviewers to see a statement. |
| 2Add condition sets if needed | Click Add Condition to show different wording to a specific stage, group, or reviewer. Reorder condition sets with the up and down arrows, they're checked top to bottom and the first match wins. |
| 3Save | Click Create. The Attestation is live immediately, there's no separate publish step. |
3. Link it to a workflow
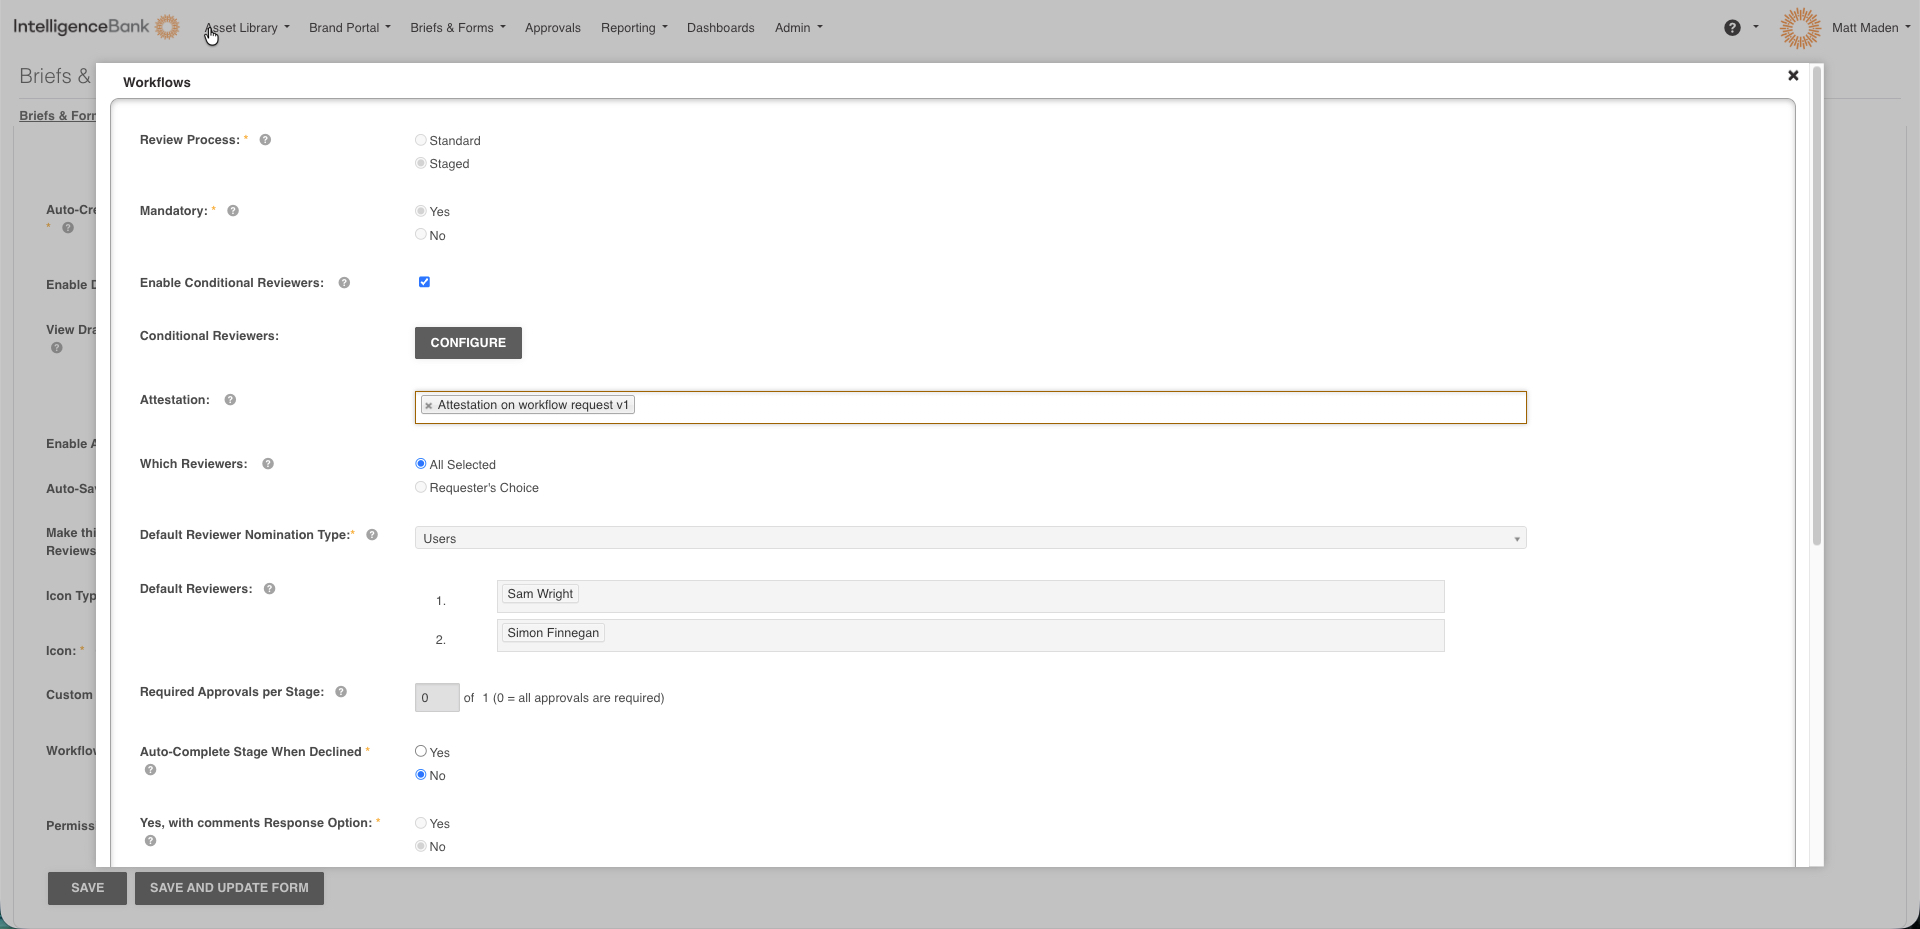
Where you go depends on what the workflow approves, a database record or a file uploaded to one. A workflow can only ever have one Attestation linked at a time.
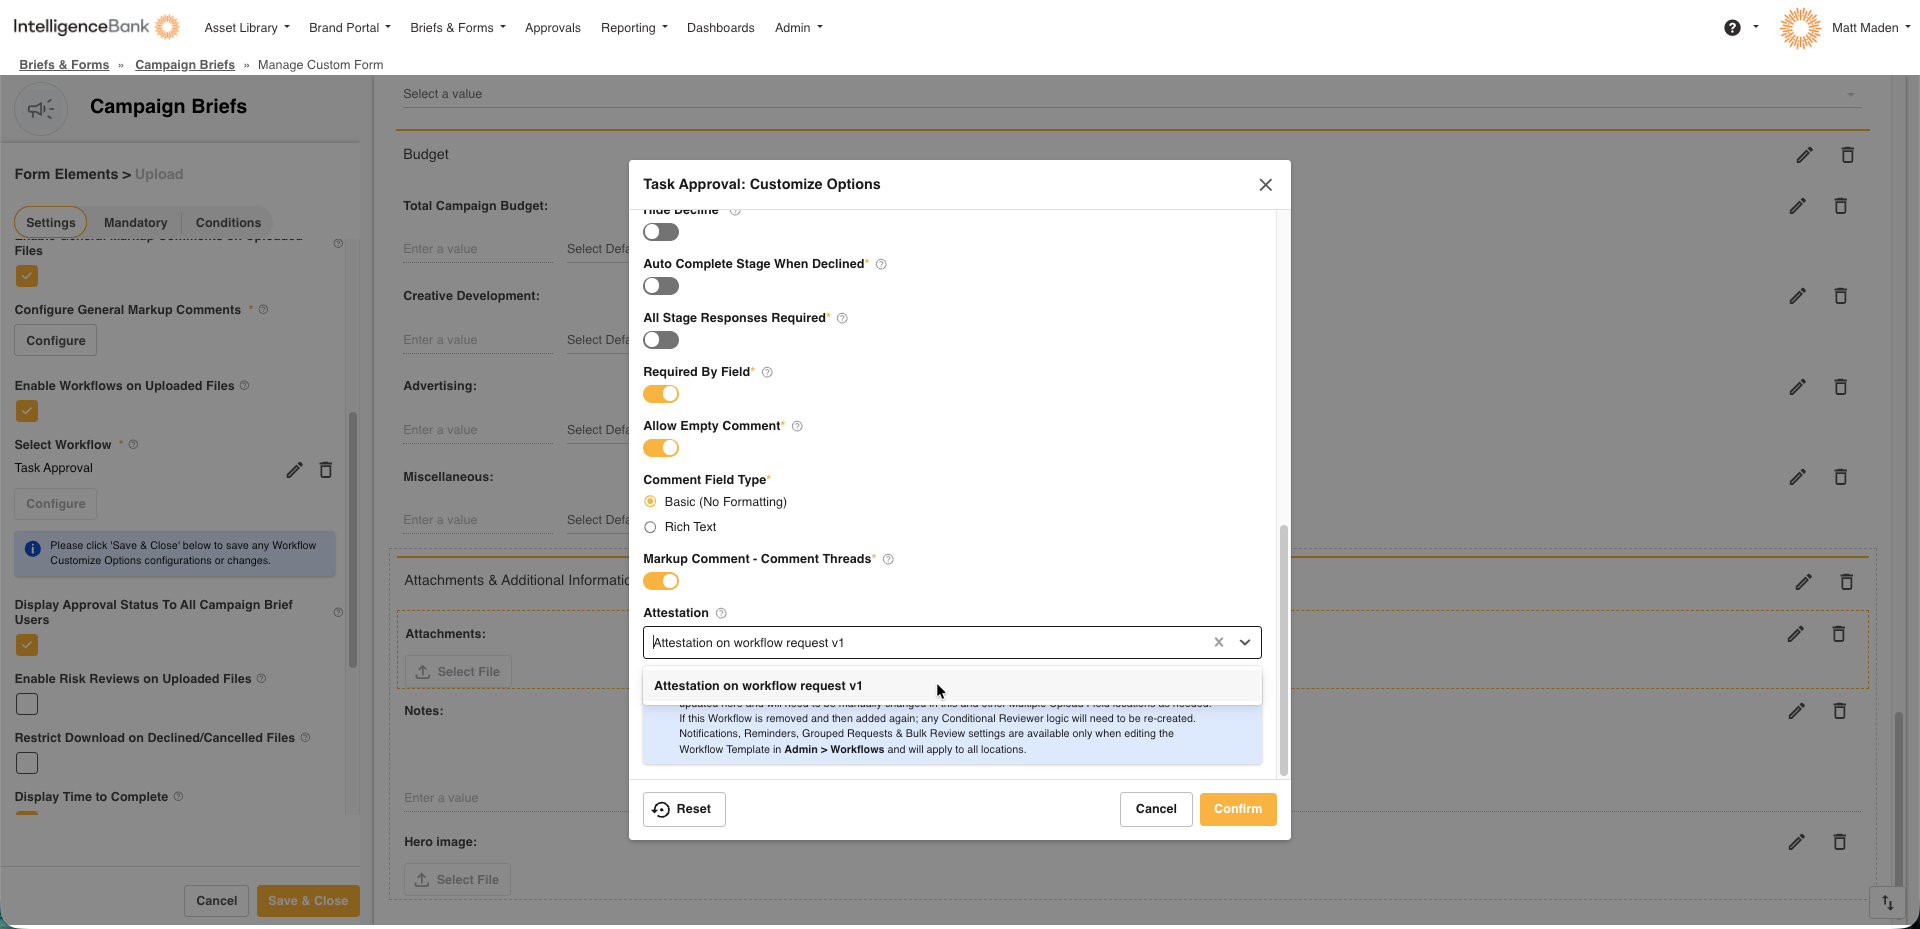
If the workflow approves an uploaded file:
| 1Open the upload field's settings | From your site home, go to Admin, open the database, and go into its form settings. Open the specific upload field where users submit the files being approved. |
| 2Enable workflows on the field | Check Enable Workflows on Uploaded Files if it isn't already on. |
| 3Open the workflow settings | Under Select Workflow, click Configure for a new workflow, or the pencil icon next to an existing one. |
| 4Choose the Attestation | In the popup, select your Attestation, then click Confirm. Save the field settings, selecting an Attestation doesn't save on its own. |
If the workflow approves a database record:
| 1Open Database Settings | From your site home, go to Admin, open the database, and choose Database Settings from its menu. |
| 2Find the Workflow section | Click Add Workflow if none is attached yet, or click the name of the workflow that's already there. |
| 3Choose the Attestation | In the Workflow popup, select your Attestation, then click Save to apply the link. |
How It Works
Once linked, attestation appears automatically inside the approval a reviewer is already looking at, there's no separate screen to visit. Opening an approval that requires attestation shows the statement and a checkbox directly in the approval panel. The reviewer reads it, ticks it, and submits, all in one step. Approve, Decline, and Approve with Comments stay locked until the box is ticked, there's no way to submit around it.
The exact wording a reviewer sees depends on their stage and group at that moment. If you've set up condition sets, they see whichever wording matches them first, otherwise they see the base statement.
Approving several files at once works the same way, but without repeating yourself. If every file in the selection resolves to the same statement, one tick covers the whole batch. If the selection is mixed, you'll be prompted once per distinct statement, files sharing a statement stay grouped together. Behind the scenes, every file still gets its own permanent confirmation record, even when one tick covered several of them.
If you go back and edit a response you already submitted, you'll be asked to confirm again, even if the statement hasn't changed, and both the original and the new confirmation are kept on record. If someone edits the statement's wording while a reviewer has the approval open, that reviewer's submission is rejected and the screen refreshes to the current wording, so nobody can end up confirming outdated text.
Making Changes
Statements, Attestations, and workflow links can all be changed after they're set up, each has its own place to do it.
To retire a statement: open the statement library, use the row menu to Archive it. This removes it from the list offered for new Attestations, but anything already using it keeps working normally. If it's still in active use, you'll be asked to repoint those Attestations first. You can Reactivate an archived statement at any time.
To update wording, targeting, or condition sets: open the statement or the Attestation and edit it directly, changes take effect immediately, there's no publish step. Note that editing a statement's wording doesn't undo confirmations already recorded against the previous wording, history always keeps the exact text a reviewer actually saw.
To remove attestation from a workflow: open the same workflow settings screen you used to link it, clear the Attestation selection, and save.
Reporting on Attestations
There are a few ways to see who has confirmed what, and all of them always show the exact wording a reviewer confirmed at the time, even if the statement has since been edited or archived.
On the approval itself
| 1Open the approval | Open the approval request you want to check. |
| 2Check the Response section | Any confirmed attestation shows there alongside who responded and when. |
Workflow History
| 1Open Workflow History | For a database record, open the record and click its History link. For an uploaded file, choose Workflow History from the actions menu, available from the Approvals List, the file's own resource page, or the dashboard. |
| 2Open a response for detail | Click the info icon next to any response row to see the full detail, including the exact statement text confirmed. Use Previous and Next to page through the others. |
Stats reporting
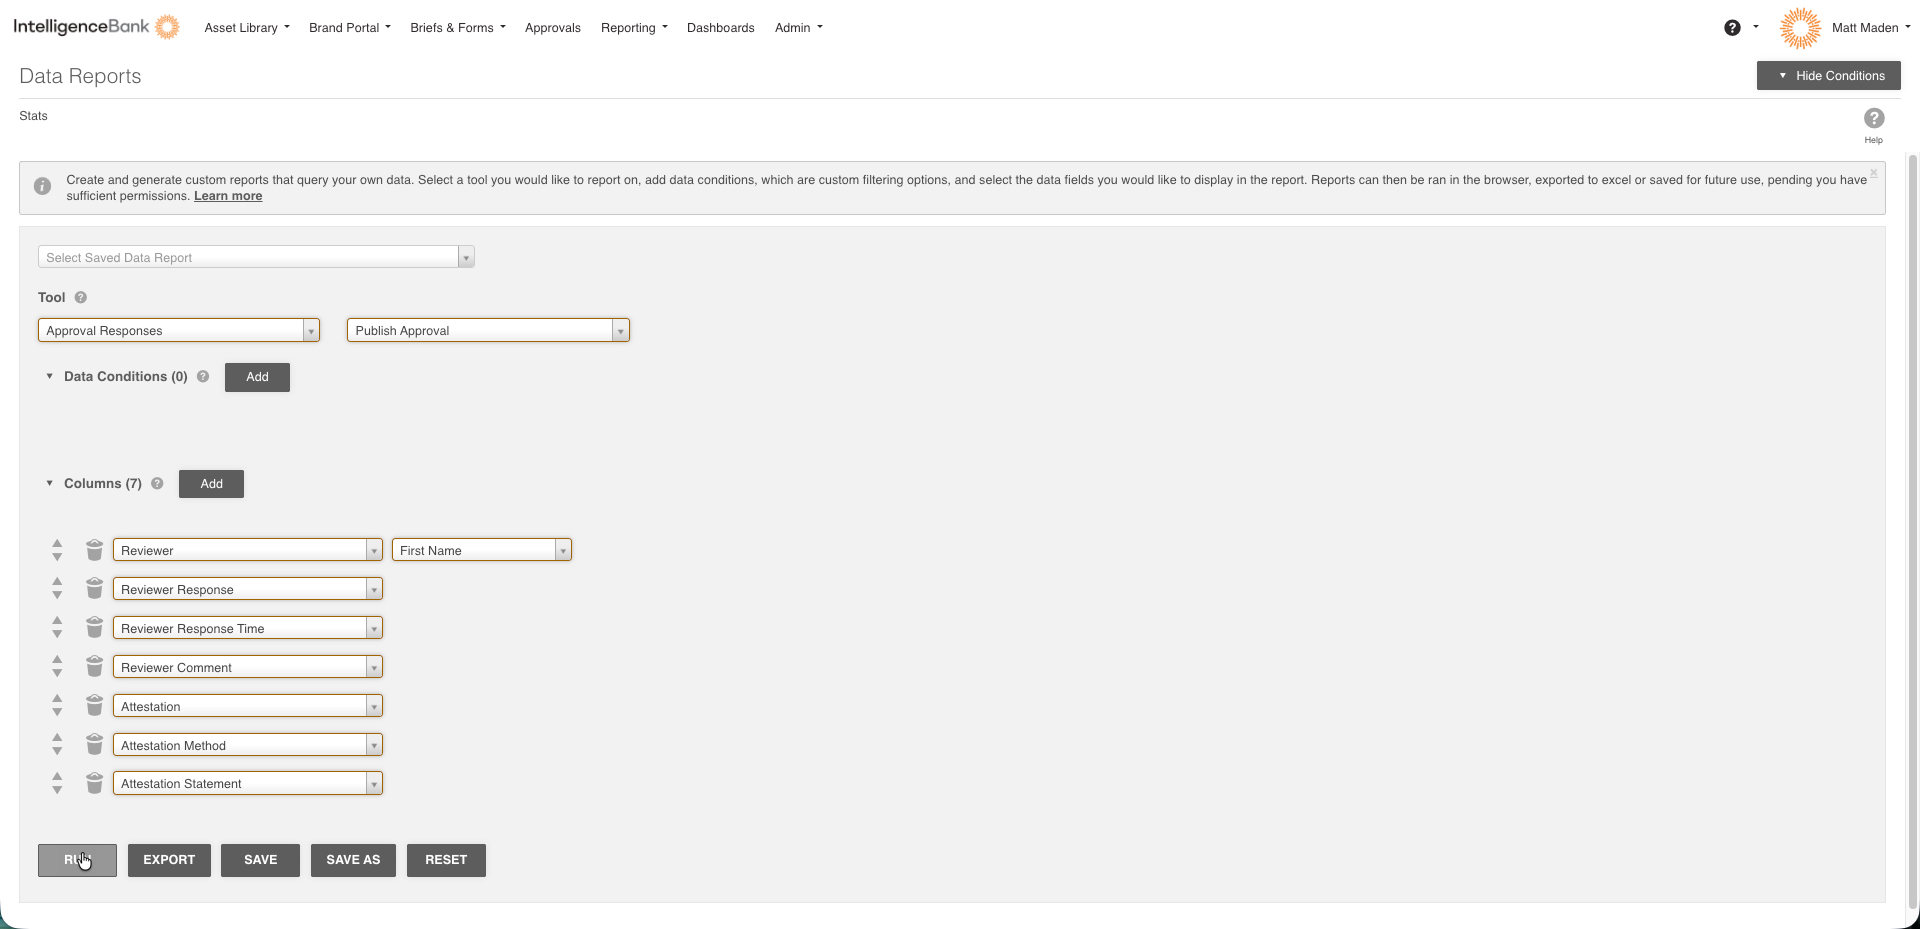
The Approval Responses stats report can include attestation details as part of its columns. When building or editing this report, add the following fields to see who has responded to an attestation and what they confirmed:
- Attestation, the statement's title
- Attestation Stage, the stage it was confirmed at
- Attestation Method, how it was confirmed
- Attestation Statement, the exact wording confirmed
These fields can be filtered as well as displayed, so you can narrow the report down to specific attestation activity rather than scanning every approval response.
Troubleshooting
| No attestation options appear anywhere | Attestation may not be enabled for your account yet. Contact IntelligenceBank Support or your Customer Success Manager to confirm. |
| Can't archive a statement | An active Attestation is still using it. Repoint those Attestations to another statement, or set them to "Use Nothing," then archive. |
| Can't link a second Attestation to a workflow | This is expected, only one Attestation can be linked per workflow. Add condition sets to your existing Attestation instead. |
| My submission was rejected after I ticked the box | The statement's wording was likely updated while your approval was open. The screen refreshes automatically, re-read and tick again to submit. |
| I don't see the Attestation option when editing a workflow | You may be editing a workflow template rather than a live workflow. Attestation is linked on the live workflow, not the template. |
FAQs
Does every reviewer need to attest? Only reviewers matching the workflow, stage, group, or reviewer you've targeted. You choose exactly who's covered.
Can I use different wording for different roles? Yes, using condition sets. We'd recommend keeping the core statement broad and linking out to role-specific detail where you can, it's easier to maintain over time.
Can a reviewer skip attestation? No. Whenever a workflow requires it, approving, declining, or approving with comments stays locked until the reviewer ticks the statement.
What happens to past confirmations if I edit a statement? They're unaffected. History always keeps the exact wording a reviewer confirmed at the time, not the current version of the statement.
Is there a character limit on the statement? Yes, 2,000 plain-text characters for the statement body, and 150 characters each for the title and the button text.
Can I remove attestation from a workflow later? Yes, clear the Attestation selection in that workflow's settings and save.
Need Help?
For anything not covered here, reach out to your Customer Success Manager or log a ticket with IntelligenceBank Support, and include the workflow name, the Attestation and statement involved, and a screenshot of what you're seeing.
Was this article helpful?
That’s Great!
Thank you for your feedback
Sorry! We couldn't be helpful
Thank you for your feedback
Feedback sent
We appreciate your effort and will try to fix the article