In addition to editing individual assets, you can also Bulk Edit Assets.
Table of Contents
Within either of these options items can also still be updated one-by-one.
Bulk Editing Assets within Single Folders
To bulk edit assets within a specific folder:
1. Click into the desired folder and select all the assets you wish to edit. (Up to 300 supported assets can currently be selected together.)
On the asset List or Card View this will be done via the small select square that appears to the left of each asset. On the Mosaic View, hover over an asset to view the same circle and make your selection.
Alternatively, you can use the Select All shortcut at the bottom left of your asset view to automatically select all assets in the folder. Note, if your folder contains more than 300 assets, the Select All will only select the first 300.
2. Then, in your Bulk Actions menu that has appeared at the bottom of your page, select the Bulk Edit Assets option from the dropdown menu.
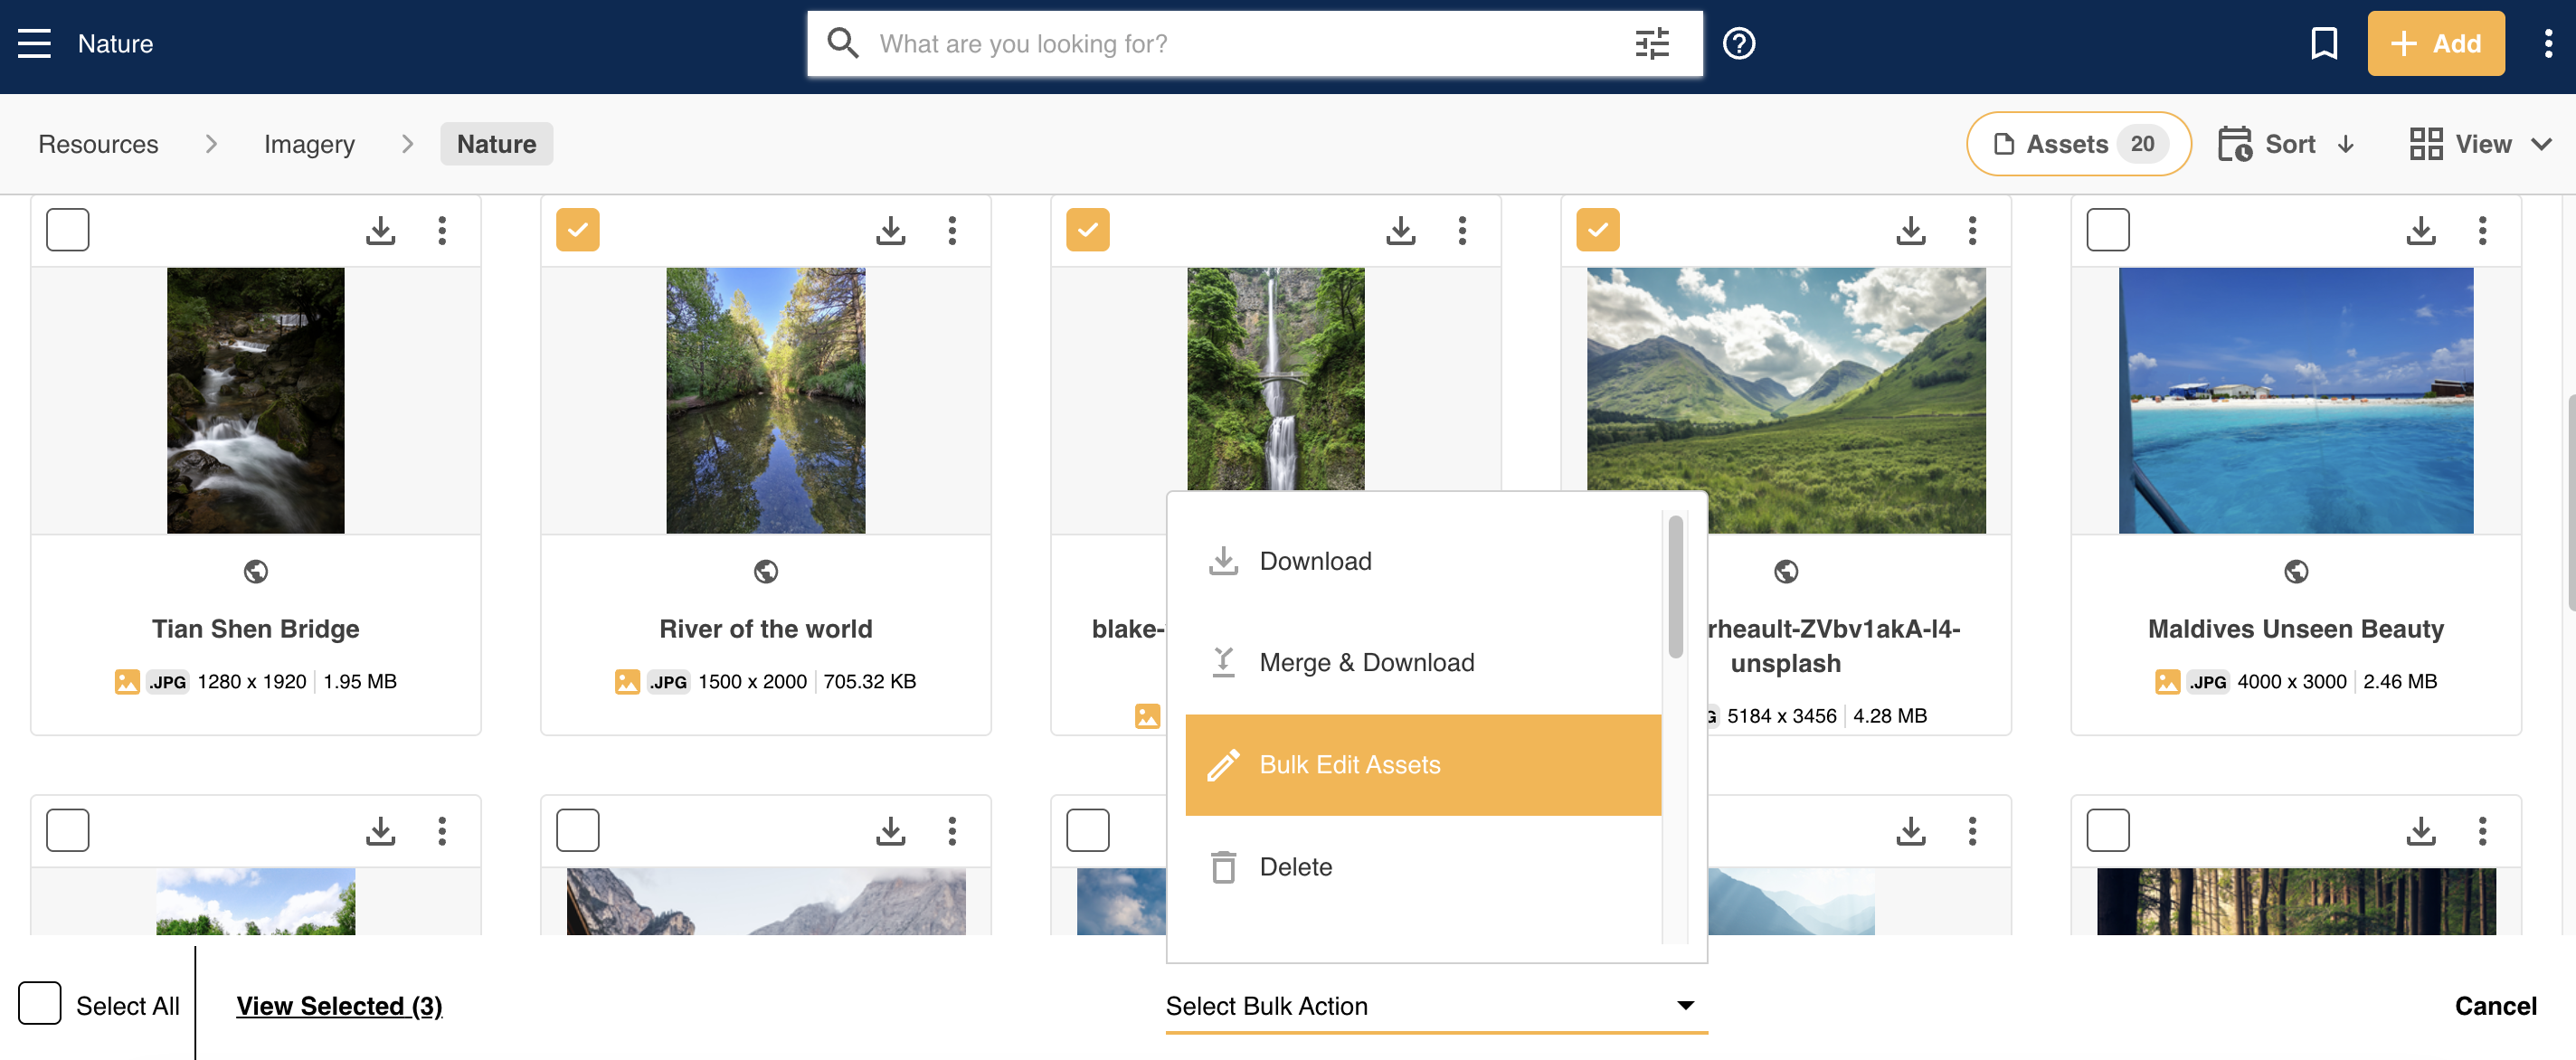
3. A new window will open displaying your selected files in a List View. From here, you can apply details in bulk.
4. The easiest way to apply details is to add the value(s) to your form and click the Apply to Selected button located at the bottom right of the Main Details panel. When selected, the values will be applied to any selected file in the list on the left.
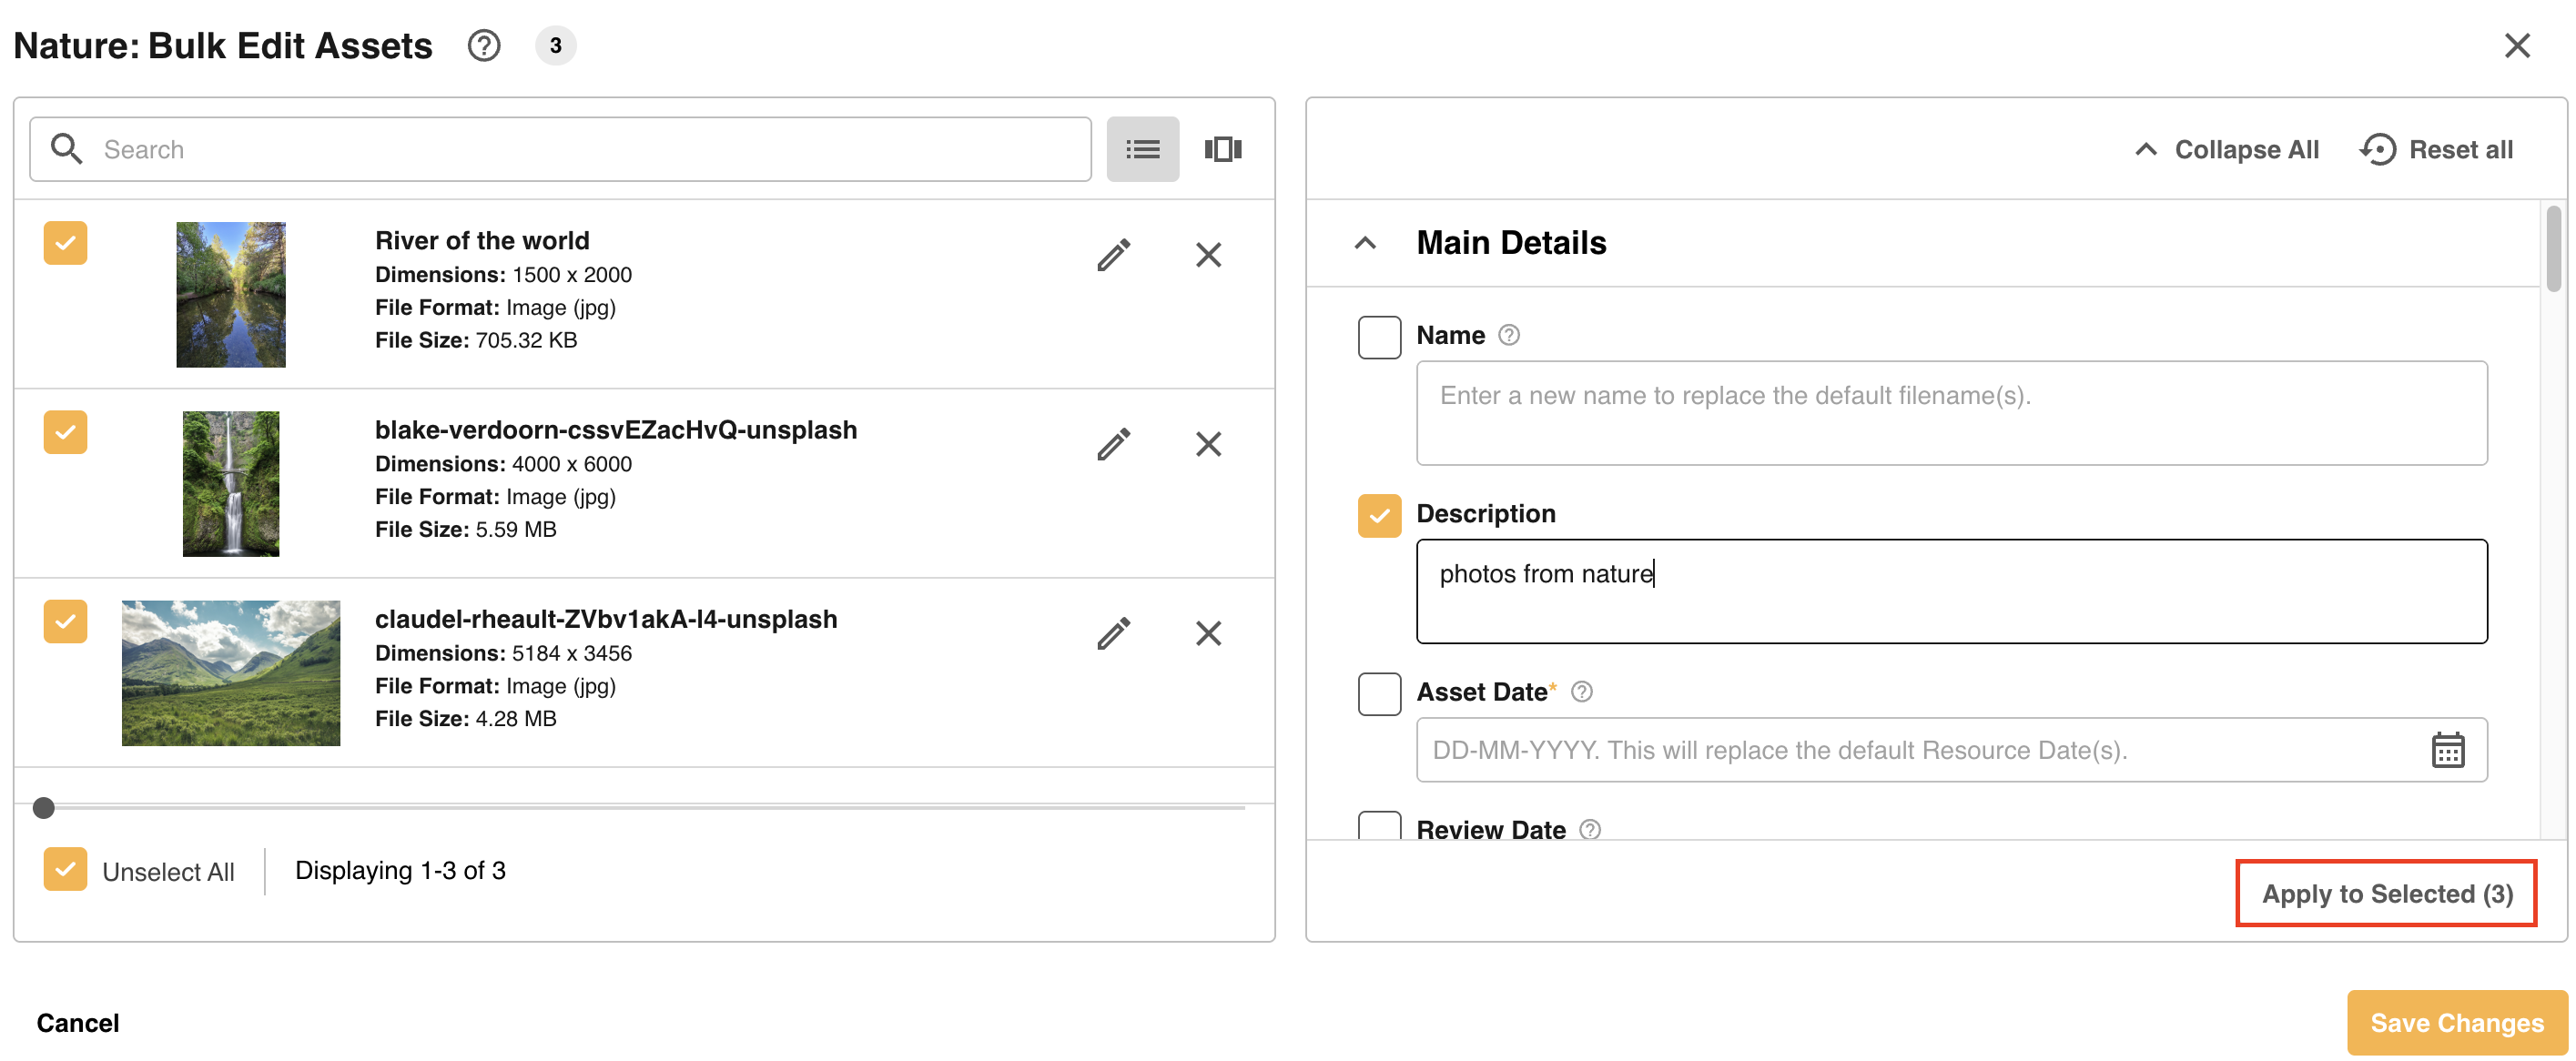 The number next to Apply to Selected refers to the number of files selected. If there is a search or filter selected within the asset queue, this will update to Apply to Results, with the changes only being applied to the files within that results list.
Next to each field on the Bulk Upload page is a checkbox. The Apply Change checkbox is automatically enabled whenever a value is added to that field or a change is made, ie if a keyword is added. The checkbox is enabled to indicate that the field will be applied when the user clicks Apply to Selected.
If you have added values and don't want them to apply to your selected files, you can uncheck that option for the relevant fields. If a field is unchecked, no values will be applied when Apply to Selected is clicked.

5. To save your files in bulk, select the files you wish to save and click the Save Changes button at the bottom of your page. This will save only those files which are selected and completed; ie they have no errors and have completed processing.
Once you click the save button, you won't be able to work on those selected items anymore as they will be saved to your folder and removed from your Bulk Edit list. Depending on the number of files and their size, it may take a minute or two to save and remove these files.
Bulk Editing Assets across Multiple Folders
Assets can also be Bulk Edited across multiple folders. This can apply when the assets you see are a result of a Search or a Filter (or both). Just select the checkboxes to the left of each file in your search/filter results - or select the parent checkbox to automatically select all search results.
Click the Dropdown function in the Bulk Actions bar and select Bulk Edit Assets.
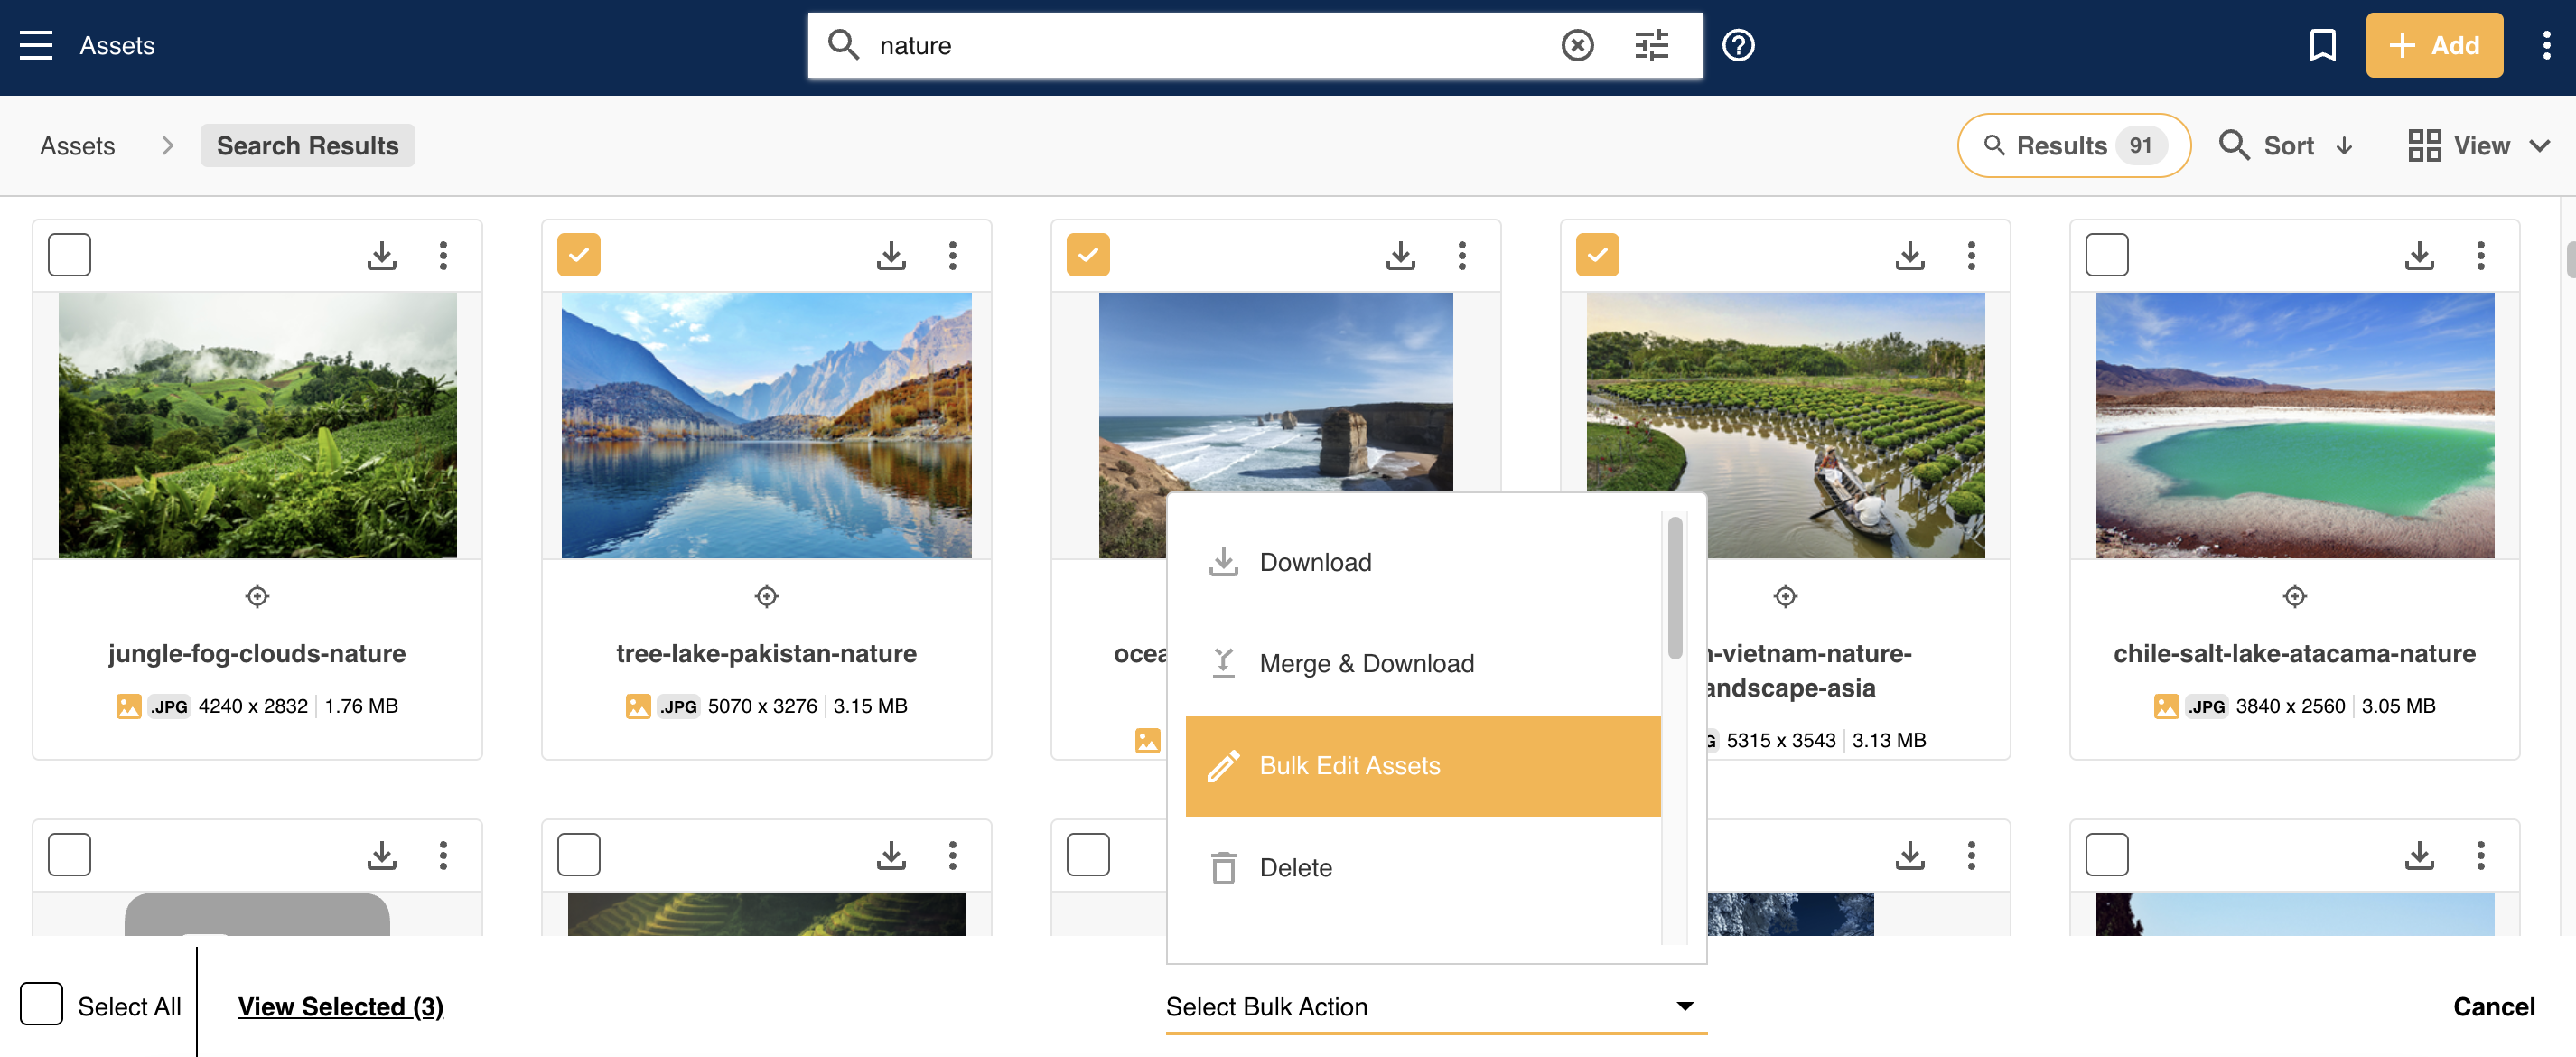
The Bulk Edit process then largely follows the same behaviour as when bulk editing items from the same folder, with the below key differences:
Folder Names and Filters
Folder names will display for each asset when 'All Folders' default filter displays. These folder names can be clicked to filter to see just that folder's selected assets.
Likewise, users can use the folder filter (as shown below) to also filter to see items from each folder.
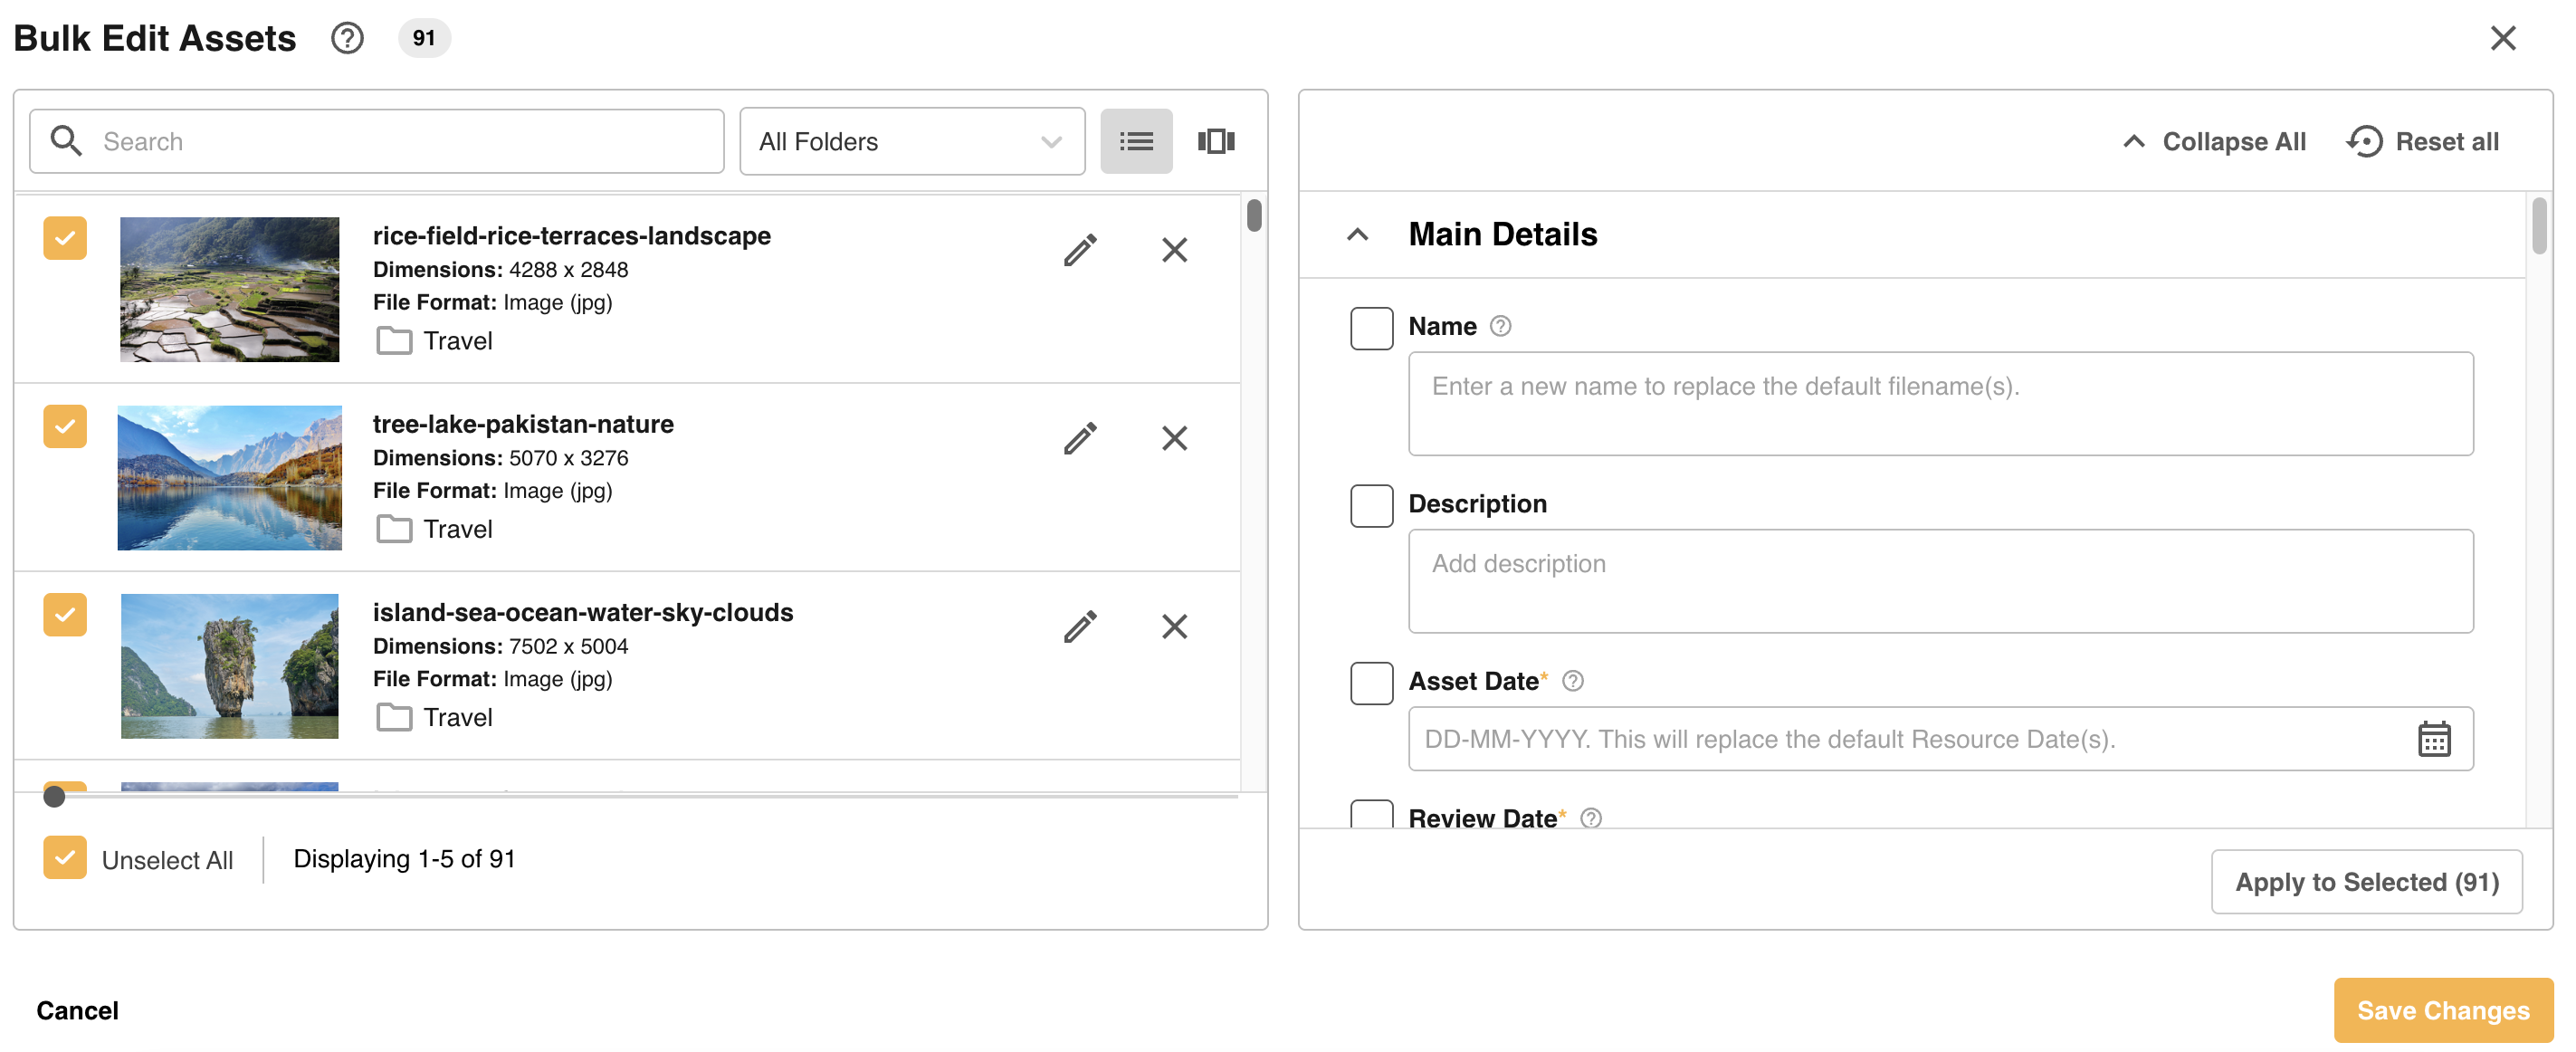
This can be an especially beneficial way to edit on a folder-by-folder basis when folders contain workflows that are different from each other.
Publish Approval Workflows Across Folders
When there are multiple folders involved in bulk editing, and not all folders involved share the same Global Workflow settings, then the Request Approval section will look a little different than normal when 'All Folders' default filter displays - specifically the Reviewers field will be disabled (since this likely differs between folders, as shown below:)
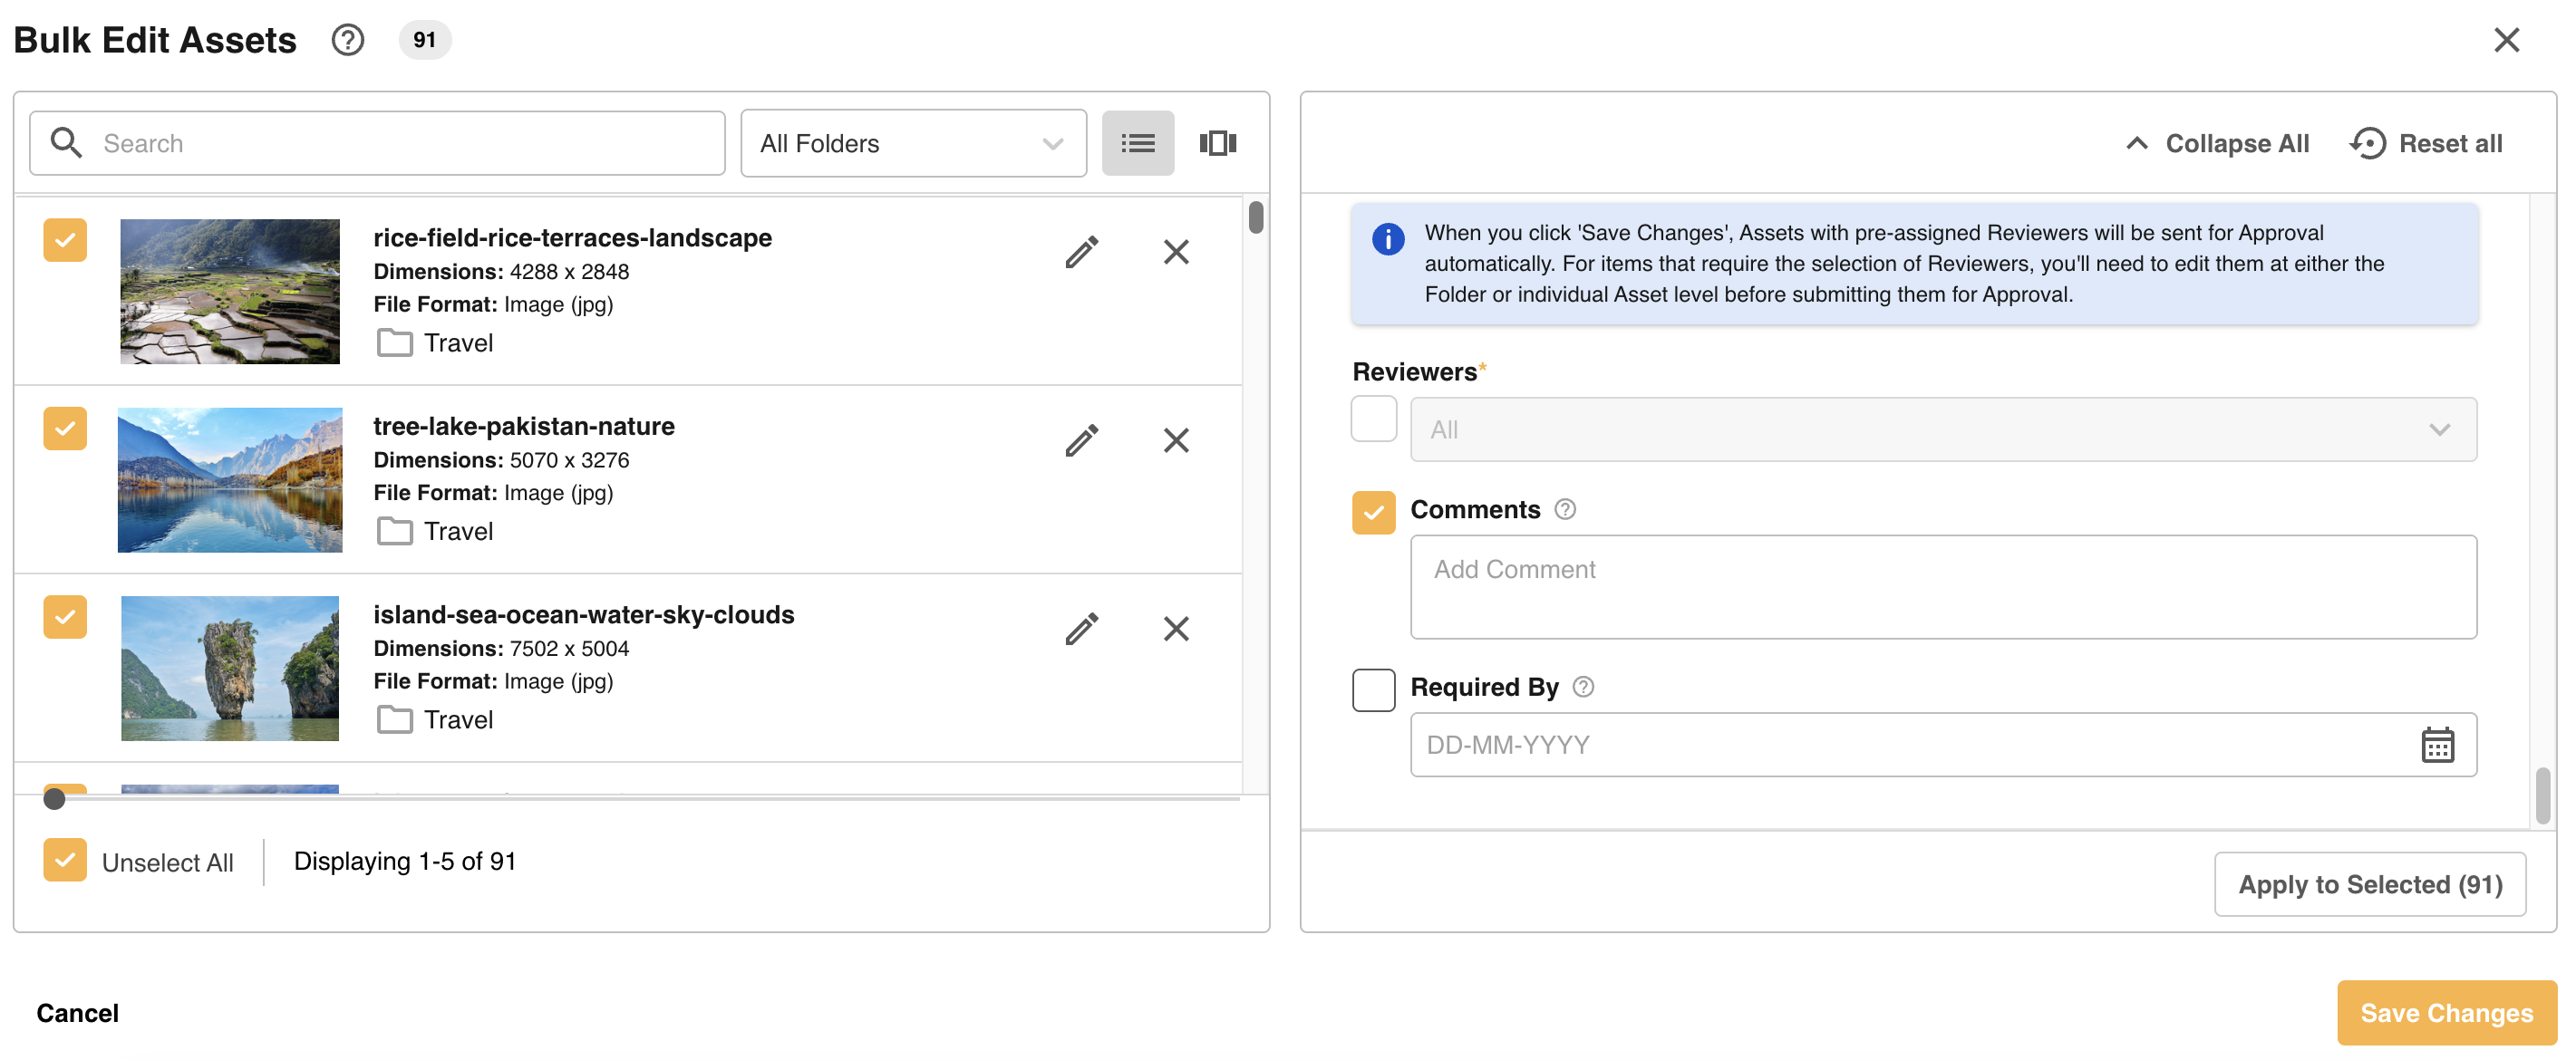
If you see this disabled Reviewers field, then note that when you click 'Save Changes', selected assets with pre-assigned Reviewers will be sent for approval automatically. Items that require the selection of reviewers will need to be edited at either the folder level (using filters as detailed above) or on the individual asset level before submitting them for approval.
Grouped Publish Requests
When enabled, the Grouped Resource Publish Request feature allows items that are edited together via a Publish Approval process to be grouped together, which requesters can monitor collectively or still as individual requests. It also allows reviewers to respond to such multiple requests within a group all at once.
It will apply to either items that are being edited from the same folder, or in some cross-folders bulk editing scenarios. Click here to read more on this feature.
Editing Folder-by-Folder
When a specific folder is selected from the filter, then when all items from that folder are removed or successfully submitted, you will be taken to the next folder's assets to edit (or, back to your asset search/filter results if no assets remain to be edited.)
Adding Information to a Single Asset
For either Bulk Edit scenarios (same folder, or across multiple folders) items can still be edited individually within the Bulk Edit experience.
if you need to customise each individual file with unique metadata, the single file view allows you to edit and then save each file individually. This makes it simple to confirm and double check the information prior to saving.
You can access the single file view either by switching the view option from list to single or by clicking on the thumbnail, filename or the edit icon of the file.
Click Save & Next to move onto the next file to update or switch back to the list view
Unsupported Asset Types in Bulk Edit
Some asset file types are not supported for bulk edit. If selected prior to the bulk edit action being selected, they will not be added to the bulk edit page, which a snackbar message will confirm for you.
These unsupported asset types are:
- Aliases
- Remote Files
- Web-to-Print Templates
- Web URLs
Was this article helpful?
That’s Great!
Thank you for your feedback
Sorry! We couldn't be helpful
Thank you for your feedback
Feedback sent
We appreciate your effort and will try to fix the article